This includes not only the mandatory .gitlab-ci.yml file containing
the pipeline configuration but also an Emacs Lisp file for exporting
the blog post and pages from the content-org files to markdown using
Emacs and ox-hugo.

It was also necessary to remove thr orgit links from the "My Emacs
Package of the week: orgit" post since these required that the linked
repository is at the given path which is not possible in the CI build.
Well, it is /possible/ but there is no good way to do it.

Additional the .gitmodules file was updated to use a relative local
path instead of and SSH URL since GitLab can obviously not clone form
an SSH URL. This may make things more difficult for local setups but I
think I can live with the one additional clone command.
217 KiB
- Update on Publishing my Emacs Configuration
- Publishing My Emacs Configuration
- Update on my Org-roam web viewer
- RSS aggregators and a hard decision
- My Emacs package of the week: orgit
- New Project: Accessing my Org-roam notes everywhere
- Improving my new blog post creation
- How this post is brought to you…
- 100 Days To Offload
- Updates to my website
- Automatic UUID creation in some Org-mode files
- „Mirroring“ my open-source Git repos to my Gitea instance
- Switching my Website to Hugo using ox-hugo
- Quick Deploy Solution
- Updated: Linux Programs I Use
- Firefox tab bar on mouse over
- Scrolling doesn't work in GTK+ 3 apps in StumpWM
- Disabling comments
- Moving the open-source stuff from phab.mmmk2410 to GitLab
- Cavallino-Treporti (IT) Bicycle Tour 1
- Netzwerkseminar
- Der Drucker
- Rangitaki Version 1.5.0
- Quote by Wang Li
- Rangitaki Version 1.4.4
- Morse Converter Web App 0.3
- Rangitaki Version 1.4.3
- Rangitaki Version 1.4
- How to run a web app on your desktop
- Rangitaki Version 1.3
- Programs I use
- The Ending Year
- The Ending Year
- Rangitaki Version 1.2
- Rangitaki Version 1.1.90 Beta Release
- Rangitaki Version 1.1.2 Development Release
- Scorelib
- In the lab
- Winter is coming…
- Rangitaki Version 1.1.0 Development Release
- New piece coming soon
- Rangitaki Version 1.0
- Morse Converter Android 2.4.0
- Morse Converter Desktop Version 2.0.0
- Landesverrat
- Artikel vom 15.04.2015
- Konzept zur Einrichtung einer Referatsgruppe 3C „Erweiterte Fachunterstützung Internet“ im BfV
- Hintergründe, Aufgaben und geplanter Aufbau der EFI
- Referat 3C1: „Grundsatz, Strategie, Recht“
- Referate 3C2 und 3C3: „Inhaltliche/technische Auswertung von G-10-Internetinformationen“
- Referate 3C4 und 3C5: „Zentrale Datenanalysestelle“
- Referat 3C6: „Informationstechnische Operativmaßnahmen, IT-forensische Analysemethoden“
- Personalplan der Referatsgruppe 3C „Erweiterte Fachunterstützung Internet“ im BfV
- Referatsgruppe 3C: Erweiterte Fachunterstützung Internet
- Referat 3C1: Grundsatz, Strategie, Recht
- 3C1: Querschnittstätigkeiten
- 3C1: Serviceaufgaben
- 3C1: Bearbeitung von Grundsatz-, Strategie- und Rechtsfragen EFI
- 3C1: Zentrale Koordination der technisch-methodischen Fortentwicklung, Innovationssteuerung
- 3C1: Bedarfsabstimmungen mit den Fachabteilungen
- 3C1: Zusammenarbeit mit weiteren Behörden
- Referat 3C2: Inhaltliche/technische Auswertung von G-10-Internetinformationen (Köln)
- 3C2: Technische Auswertung von G-10-Internetdaten
- Referat 3C3: Inhaltliche/technische Auswertung von G-10-Internetinformationen (Berlin)
- 3C3: Technische Auswertung von G-10-Internetdaten
- Referat 3C4: Zentrale Datenanalysestelle (Köln)
- 3C4: Analyse von Datenmengen (methodischen Fortentwicklung, Evaluierung von neuen IT-Verfahren zur Datenanalyse, Abstimmung mit Kooperationspartner in diesen Angelegenheiten)
- 3C4: Technische Unterstützung
- Referat 3C5: Zentrale Datenanalysestelle (Berlin)
- 3C5: Analyse von Datenmengen (methodische Fortentwicklung, Evaluierung von neuen IT-Verfahren zur Datenanalyse, Abstimmung mit Kooperationspartner in diesen Angelegenheiten)
- 3C5: Technische Unterstützung
- Referat 3C6: Informationstechnische Operativmaßnahmen, IT-forensische Analysemethoden
- 3C6: Unkonventionelle TKÜ
- Konzept zur Einrichtung einer Referatsgruppe 3C „Erweiterte Fachunterstützung Internet“ im BfV
- Artikel vom 25. Februar 2015
- Artikel vom 15.04.2015
- Morse Converter Desktop Public Beta 1.9.3
- Rangitaki Version 0.9: Release Condidate for 1.0
- Rangitaki Version 0.8
- Rangitaki Version 0.7 - The alpha release
- A new design for marcel-kapfer.de
- Rangitak version shedule until 1.0
- Rangitaki Version 0.5 and Material Design
- Morse Converter Android App Version 2.2.7
- Morse Converter Android App Beta testing
- Rangitaki Version 0.2.2
- From pBlog to Rangitaki
- Abitur und Weisheitszaehne
- Web App Alpha Release
- pBlog Version 2.1
- About the Future of pBlog
- pBlog Version 2.0
- Morse Converter Android Version 2.1
- Morse Converter Debian Package
- pBlog Version 1.2
- pBlog Version 1.1
- Week in Review
- pBlog Version 1.0
- Material Bildschirmhintergründe 1 und 2
- pBlog Version 0.3
- pBlog Version 0.2
- Morse Converter Android Version 2.0
- Material Wallpapers 1 and 2
- Morse Converter Desktop Version 1.1.1
- Morse Converter Desktop Version 1.1
- Blog (Experimental)
- The Ending Year
- UPDATE: Bash script for LaTeX users
- UPDATE: Bash Skript für LaTeX Benutzer
- Bash script for LaTeX users
- Bash Skript für LaTeX Benutzer
- Morse Converter Android Version 1.0.1
- Morse Converter Desktop Version 1.0.2
- Morse Converter Desktop Version 1.0.1
- Comfortaa Font for Cyanogenmod Theme Engine
- Morse Converter sourcecode now on GitHub
- Comfortaa Font für Cyanogenmod Theme Chooser
- Morse Converter Android App Version 1.0
- Morse Converter Android App Version 1.0
- Morse Code Converter Android App Version 1.0
- Morse Code Converter Version 1.0.0
- Morse Converter Version 1.0
- Morse Converter Version 1.0.0
- Punktebilanz
- Morse Converter Version 0.2.2
- Morse Converter Version 0.2.1: First public release
- The writtenMorse website is online
- Morse Converter Version 0.2
- Morse Converter Version 0.1
- Installation of Debian 8 "jessie" testing
- Schöne ruhige Zeit
- 15. September 2013
- 02. August 2013
- 22. Juli 2013
- Meinungsfreiheit in Deutschland?
DONE Update on Publishing my Emacs Configuration @100DaysToOffload emacs orgmode hugo web
CLOSED: [2022-02-02 Wed 20:42]
- State "DONE" from "TODO" [2022-02-02 Wed 20:42]
After posting my last blog article about publishing my Emacs configuration on Fosstodon, Kaushal Modi (the maintainer of ox-hugo the org mode to hugo exporter that I use for my Blog) wrote me and brought the idea up to publish my Emacs configuration using ox-hugo and hugo. I didn't even think about that and so the same evening I tried it. If you've read my previous blog post you know the amount of code and work that is necessary to get org-publish running, with ox-hugo I need to add the following three lines on top of my config.org file.
#+HUGO_SECTION: config
#+HUGO_BASE_DIR: ~/projects/mmk2410.org/
#+EXPORT_FILE_NAME: index
That's all, you may wonder? Well… I also need to export the file. For me these are the keys: C-e H H (If you're normal that is: CTRL+e followed by H and again followed by H). That's it. Crazy, isn't it! Running hugo serve and navigating to http://localhost:1313/config (yes, you currently (as of 2022-02-02) find this version of the config at mmk2410.org/config, but don't share or save this link as I may or may not remove the page soon, use config.mmk2410.org for this) showed my complete configuration nearly the same as by using org-publish. The only difference is that the slight theme adjustments I made for the org-publish configuration are not there (duh…) and there is no table of contents. But the TOC is another problem anyway since it is in my opinion too large to
display directly on the page, as I already wrote in the other post.
The other "next step" I mentioned there was to automatically run the org-publish configuration and publish the new config page after pushing a change. This is also something I need to do with my blog. I currently write blog posts from two different machines and three different operating system installations and remembering to run a git pull via Magit before starting to write is already hard enough for me. Since my hugo publish script only runs hugo to build the site but not Emacs and ox-hugo in advance to export the latest state of the posts I uploaded an incomplete website more than once last month. So either I adjust the script to run some Emacs snippet for running ox-hugo (and including the config export would be easy there) or I go the “DevOps” way and configure a pipeline that runs on every commit, exports the articles, builds the page and publishes it somehow. So the automating task is also something that I need to do anyway.
This puts me in a difficult position: what should I do? On the one hand org-publish approach is very "emacsy" and therefore fits the project of publishing a Emacs configuration really well, on the other hand it is by far easier to use ox-hugo for this. I'm still not sure what to do but I want to decide quite soon since the current workflow of manually publishing two websites slowly starts to annoy me. Especially since I do edits on both quite often.
I'll keep you posted!
Day 9 of the #100DaysToOffload challenge.
DONE Publishing My Emacs Configuration @100DaysToOffload web emacs orgmode
CLOSED: [2022-01-30 Sun 20:19]
- State "DONE" from "TODO" [2022-01-30 Sun 20:19]
Introduction
As you may know, I'm using Emacs for various task and I have a configuration for doing so. I think that documentation is an important part of a configuration, especially if it is not something I read or work with every day and I want to read up on certain things and decisions after a long time. That's why I chose to write my Emacs configuration using literate programming by using Org Babel. This means that I have one large Org-mode file (currently 2265 lines) with headings, texts and Emacs Lisp source code blocks which are my actual configuration and which will get read and evaluated on Emacs startup. There are multiple ways for achiving this and I adopted the approach taken by Karl Voit.
Writing such a configuration is not done on the first day of using Emacs and so during the past years I have probably learned most things I know about Emacs by reading config files of other users and I'm really grateful for all the people who made their responding Git repository public.
There are some people with a literate configuration who didn't stop at this point and even made a website from their config. The funny thing about this is that it is actually quite easy to achieve. The four people I've linked and many more all have their config file written in Org mode and Org mode allows for exporting to various formats (there are a few built-in and many more available as additional packages). For a more advanced exporting functionality it is possible to configure a project for publishing. This is not limited to a configuration file! It's also possible to write a blog just using the Org-mode publishing feature, or a thesis or a novel or something entirely different. The sky is the limit. And so I also fell down further in the Emacs rabbit hole and wrote a configuration to publish my configuration as an HTML website.
How it works
Note: I will discuss the implementation/configuration in parts (and not everything). You can find the complete code in my Emacs config repo.
Starting off was easy because conceptually it was quite clear how it should work and what I need (I also looked into the SystemCrafters Org Website Example repo and the SystemCrafters Wiki repo a while back):
- An
org-publishconfiguration that defines how the HTML page should be build given theconfig.orgEmacs configuration. - A small Emacs Lisp file for running the build process since I prefer it to export from an own headless Emacs instance with own variables and perhaps even packages that I don't need (or even want) in my main Emacs instance. The file is also needed for running Emacs in a way that it doesn't show up but only processes the instructions.
- A shell wrapper script that starts Emacs and tells it to only run the Emacs Lisp file containing the
org-publishconfiguration and its execution. - Some style sheets so that the result looks at least half-way decent.
- A shell script for uploading the outputted files to my VPS.
Shell Wrapper Script
I started with the easy part: the shell wrapper script:
#!/bin/sh
emacs -Q --script ./publish.el
The -Q flag tells Emacs to ignore all system or user configuration so it starts as a blank slate. The --script ./publish.el option tell Emacs to load and process the publish.el file. That's it!
Emacs Lisp File and Org-publish Configuration
Now let's focus on this file which contains the org-publish configuration as well as some supporting code.
First of all I define some variables, like additional HTML-Head entries, the directory where to write the output and the header (which only includes my name with a link to my website). Then I re-create the output directory:
;; Note: I'm using a variable for the path in the code.
;; But since this is an excerpt I find the explicit notation clearer.
(when (file-directory-p "/tmp/dot-emacs-publish/")
  (delete-directory "/tmp/dot-emacs-publish/" t))
(mkdir "/tmp/dot-emacs-publish/")
Next the more annoying part of the config. Since I run Emacs with the -Q flag none of the already installed packages are used and also my config file is not parsed. While this is what I want I need to configure the package management myself.
(setq-default load-prefer-newer t)
(setq package-user-dir (expand-file-name "./.packages"))
(package-initialize)
(add-to-list 'package-archives '("nongnu" . "https://elpa.nongnu.org/nongnu/") t)
(package-refresh-contents)
(package-install 'htmlize)
(add-to-list 'load-path package-user-dir)

(require 'org)
(require 'ox-publish)
(require 'htmlize)
Org and ox-publish are already part of Emacs and the included version is enough for my needs. So I only need to install htmlize which I will use later for source code highlighting.
After this more basic stuff I can now define my org-publish-project-alist containing the definition for the export.
(setq org-publish-project-alist
      `(("dot-emacs:org"
         :base-directory "~/.emacs.d"
         :publishing-directory ,mmk2410/dot-emacs-publish-publishing-dir
         :exclude ".*"
         :include ("config.org")
         :publishing-function org-html-publish-to-html
         :section-numbers nil
         :html-doctype "html5"
         :html-head-include-default-style nil
         :html-head-include-scripts nil
         :html-head-extra ,mmk2410/dot-emacs-publish-html-head-extra
         :html-html5-fancy t
         :html-preamble ,mmk2410/dot-emacs-publish-html-preamble
         :html-self-link-headlines t
         :html-validation-link nil
         )
        ("dot-emacs:static"
         :base-directory "~/.emacs.d/publish/assets"
         :publishing-directory ,mmk2410/dot-emacs-publish-publishing-dir
         :base-extension "css\\|woff\\|woff2\\|ico"
         :publishing-function org-publish-attachment
         :recursive t)))
I declare two “projects”. The dot-emacs:org is the one that handles the export of the Emacs configuration. Using the combination of :exclude and :include allows me to first exclude all files and then re-include only my config.org. Thereby, I can ignore my README.org and potentially other files ending with .org that I create in the future unless I add them explicitly. The other definitions are not that interesting and their meaning is already well explained in the Org mode documentation. The dot-emacs:static project just copies (that's what the org-publish-attachment function does) all file in the base directory with the given extensions to my output directory. One thing I learned while writing this part (since my only experience with Emacs lisp is writing configurations) was the way to use variables in this definition. Apparently they need to get prefixed with a comma and the list with a backtick. Just using an apostrophe won't do it.
That's all the configuration that Is need for running the Org publisher. So we can run it!
(org-publish-all t)
The final bit of the script is a little difficult (not the implementation but the future impact). By default Org-mode outputs the files with the same filename except the extension, of course. At the moment my config page only has one configuration and therefore I rename the outputted config.html to index.html. But this may change in the future and thereby may result in broken links… I apologize in advance but at this point I don't want to invest time in creating a landing page that just has this one item for the foreseeable future.
Style Sheets
But I'm not done at this point! While the output works it does not look that nice. Org-mode brings a little bit of styling but that is extremely basic. So I needed a solution for this. Since I'm currently more or less satisfied with the design of this blog I decided to use the style sheets and adjust them to work with the output of Org. Only a few search-and-replaces (and a slight change to the h3 style) later the config page looked like this blog post.
Including the necessary fonts and a normalization style sheet was also very easy. I just copied the corresponding files from my Hugo theme.
Source Code Highlighting
As it turned out getting the syntax highlighting to work was the hardest part (since I didn't want to use a JavaScript library to handle that). There is the emacs-htmlize package which is capable of doing this and it has also an integration to Org-mode (and also the other way around). The problem is that it is intended to use it when Emacs is already running as a full instance since it uses the font definitions for generating the theme. And these are not available when running Emacs headless.
Normally htmlize outputs inline CSS when using. But for solving my problem it is better to tell it to only write the class names to the HTML file. This will also work for the build process. The following code snipped does exactly that and I added that in before my org-publish-project-alist definition in publish.el.
(setq org-html-htmlize-output-type 'css)
This part works. But where to get the CSS definitions? There's a function for that! org-html-htmlize-generate-css opens a new buffer with all CSS definitions necessary for syntax highlighting. But that would be too easy, wouldn't it? Well, htmlize thought the same way and aborted with the message: face-attribute: Invalid face: tab-line-tab. Searching the internet yielded no results and so I started “debugging” it: open a new Emacs instance with the -Q flag, install and load emacs-htmlize and run the function. To my surprise it worked. After some fiddling around I found out that the doom themes caused this problem. When using the Gruvbox themes it worked! Since using the Gruvbox color scheme was my goal anyway this problem was solved and I generated two CSS files: one using Gruvbox Light and one using Gruvbox Dark. I then combined the two files into one with prefers-color-scheme media queries. Only the background color was missing for some reason. After adding that definition the source code highlighting for the config export also worked.
Upload shell script
As of now all files are generated locally and I need some way to upload them. Since I already have a upload script for my blog I took that and deleted the Hugo related parts. Now the file only contains a rsync execution.
Next Steps
The complete configuration and publishing setup took an evening and at the end I wanted to go to sleep. So there are a few things that I want to do if I have the time.
First of all I want to automate the publishing and upload process. After each time I push a new commit to my Emacs config repo the HTML publishing should run automatically and also deploy the new files. Some folks use GitLab or GitHub Pages for this but I like to host it myself. Others may use something like GitLab Pipelines or GitHub Actions to build and publish a Docker container containing the exported files and a lightweight webserver. But I don't like that approach either (I don't dislike Docker in general but I think its overkill for this).
This means I need another solution, at least for deployment. For the build process I know that at least the GitLab CI can output artifacts. I could store the exported files there. Since I currently don't have an own CI instance I would perhaps use GitLab for this. For deployment I would need to configure a webhook that is triggerd once the pipeline is finished and the build artifacts are ready. I don't know if GitLab has such a feature but I think that its possible. The rest would be easy. A small PHP script could get triggered by the webhook and trigger a bash script for downloading, extracting and replacing the files (or the PHP script could do this).
Another solution would be to run the publish script on the VPS where also my web server is running. This would make the deployment extremely easy and the build could be triggerd by a webhook from my Gitea instance. A small PHP script could then trigger the build process. Why PHP? I could write it in one file and my Apache webserver takes care of running it. I don't need a reverse proxy, another open port or some other crazy stuff. After all I only want to check some token and execute a shell script!
Another thing that needs improvement is the navigation on the page. Currently on top there is a long table of contents (TOC) and then the contents themselves follow without any way to look at the TOC again. This is not very good UX (actually the GitHub rendering of the config.org file currently does a better job at this than the website to be honest).
Conclusion
Now for the long awaited link to my configuration: config.mmk2410.org
I'm really curious if the new published form will help someone but even if not it was fun to create it! It will also be fun to deal with the next steps and if I get to a point where I don't even need to do anything and it keeps working I don't see any reason to abandon the HTML publication even if no one uses it…
Day 8 of the #100DaysToOffload challenge.
DONE Update on my Org-roam web viewer @100DaysToOffload emacs orgmode dev
CLOSED: [2022-01-27 Thu 22:51]
- State "DONE" from "TODO" [2022-01-27 Thu 22:51]
About one and a half weeks ago I announced that I'm going to start a new (code) project for viewing my Org-roam files over the web (especially on mobile devices). Since then surprisingly much happened and so I want to give a short status update.
First of all I chose a working title for the software: brainengine. However, I'm not quite sure why. Especially the engine part since it doesn't power anything. Though the brain makes sense since some people (myself included) refer to Org-roam and similar software as their second brain. But the name may change.
Concerning the perhaps more interesting stuff: I made at lot more progress during last and this week that I expected. To be precise: as of know nearly ever core functionality works. Although I went a different route in the end.
My initial goal was to create a “classic” client-server application using Go for the backend and Alpine.js with tailwindcss for the frontend. That's why I started writing an API with Go in the first place. Parallel (and initially completely unrelated) I worked through the new Templating tutorial of Learn Go with tests by Chris James and started thinking if I maybe should use this for a start. And so I started playing around wit Go's HTML templating and as of this evening I not only have a API (that I don't use and perhaps not even need) but also an HTML representation to my Org-roam files. Both have the same feature set:
- Get a list of all notes (with title)
- Search through all notes (full-text)
- View a note (with rendered Org content)
And I did neither use Alpine.js nor tailwindcss in the end but only Go and Bulma for some basic styling.
Concerning the underlying concept nothing has changed compared to the original idea. Every single function (except reading a file) uses some Linux/UNIX command line tool in the end. bash + ls (with globbing) is used for getting a list of all Org-roam file (this will be the first thing for which I want write a Go-only solution) and grep for searching through the files and the getting the title of a node as well. Sadly the code is currently still that crappy that I'm not willing to share it yet. Perhaps I will only open-source the final application since the current implementation is only a proof-of-concept (I wanted to see where this approach might fail and I have to say: nowhere! Even the load times are by far fast enough for now).
Of course there are currently still some things that do not work or are not yet implemented:
- Currently the links in the parsed org content are working. This is perhaps the biggest bug currently and the one which I want to fix next.
- The potential source or reference of a node that is stored as a
ROAM_REFSproperty is not shown. This is needed since I sometimes have a need to visit the source or reference of a note. - The information that is put in the
+filetagsfield in the sources files is not display. Since I separated my notes using this I need it. Perhaps even with a filter or a search option. - I have quite some notes with LaTeX formulas that are not rendered. I need to search for a solution for this at some point.
Besides these four points there are certainly many other things that I need to improve. I'll write again a blog post once there are new things to tell.
Day 7 of the #100DaysToOffload challenge.
DONE RSS aggregators and a hard decision @100DaysToOffload programs selfhosting
CLOSED: [2022-01-24 Mon 21:17]
- State "DONE" from "TODO" [2022-01-24 Mon 21:17]
If you read my previous blog posts you may think “Boy, what a nerd. Only writes about Emacs. Doesn't he have a life???” and honestly I couldn't even be mad on you. But—jokes aside—as a matter of fact there is more. And so I though I should also write some blog posts about other stuff. For a totally unrelated topic I decided to write about my usage of RSS aggregators today (and no, although I use elfeed with elfeed-protocol from time to time there won't be any further mentions of Emacs in this post…).
The thing is that I soon or later need to make a difficult decision about which RSS aggregator/reader I should use. Currently I'm running two of them but let me start from the beginning.
The long and boring background
I started using RSS quite some time ago, I think it was 2013 or 2014 and initially used some kind of desktop program (I don't remember what it was, perhaps Liferea but I'm not entirely sure).
This worked quite well until I've gone travelling for a few days and needed another solution for reading my feeds during that time. Back then I had no idea about self-hosting and also didn't have an own VPS or similar (and also not the money for it). So I looked around and settled for feedly which worked quite well on desktop and mobile if I remember correctly.
I kept using it for a long time until maybe around 2015 or 2016 when I became more interested in privacy and self-hosting. Back then I found Tiny Tiny RSS, setup my own instance and lived with it for quite some time. It was a long time ago but I cannot remember any larger problems I experienced with it I only know that I found the design quite underwhelming. I remember centering the login form because I found it that off-putting…
At some later point (I think late 2017) I had less and less time available for managing my self-hosted services and moved many things into my Nextcloud instance and the Nextcloud News App became my replacement for TT-RSS. In the beginning it worked quite well but over the years many problems occurred: from random feeds that stopped updating to a bug that regularly showed already read items from various feeds (and also a large amount of entries). Nevertheless, for completeness sake I want to add that the Android app is quite well done! Better than anything else I have used (except the feedly app which also was not bad).
In the end the later problem became that annoying that I really wanted to switch away. Sorting out an unknown number of already read items from the far past up to yesterday became more and more frustrating. As a result I finally started to earch for alternatives in the first half 2021. I tried a few and at the end only Miniflux and FreshRSS fitted my needs. I first tried out Miniflux but could not get the feed updating configured correctly, experienced a (relatively)high CPU load from it and finally gave up. FreshRSS on the other hand was easy to setup and suited me quite well and so I switched to it.
What annoyed me about FreshRSS was always the really outdated design and since some other people on Fosstodon (btw. a great place to be) where quite happy with Miniflux I decided to give it another shot and set it up again in early October 2021. My primary purpose was just to try it out but somehow I got stuck with it. Because another person is also using my RSS aggregator “hosting” I didn't shut down FreshRSS back then.
The difficult problem
So since October last year both are running: FreshRSS and Miniflux. After a few months with Miniflux I quickly went back to FreshRSS about a week ago and I have to say: I don't have a problem with either one! I just know one thing: I don't want to keep hosting two services of the same type. Not because I run out of resources but I like to keep my setup clean and not have any unused services lying around. Therefore, I need to decide which to keep and which to throw away. And that's the point where it gets really difficult! Let's start a highly opinionated comparison.
Miniflux
First the good things. Miniflux has a really clean design which enables reading the news without any distractions and, thanks to the gesture support, its also a joy to use it on mobile since I don't use any apps (neither for Miniflux nor for FreshRSS, because there are no good ones IMO). Due to the design choices the load time are also great.
But the best feature that Miniflux has for me is the Pocket integration. I use Pocket a lot to save articles for reading them later and it is that well integrated that I only need to type one letter or press one button and then its saved. No other windows that opens, no other action that I need to do.
But not every is good, there are also some things I quite dislike. While the design is very clean I'm not completely satisfied. I think its a little bit to bleak and looks kind of unfinished to me. I can live with it but I realize it often.
A bigger annoyance is the feed management. There is no clear overview of all feeds but only a long list with an interesting sorting (the only way to find something is by using the browser search) and this is kind of important to me since I currently follow 205 feeds (I get nearly exclusively all my news using RSS and the number only goes up). I also have one feed that works flawlessly in FreshRSS (and also earlier in every other tool that I used) but constantly fails for Miniflux.
No longer an issue since I resolved it somehow but still something that wonders me is the polling algorithm. There are quite a few different settings for configuring this. The default scheduler sounds interesting: the feeds that are updated the most are pulled more often. While this makes sense I was never able go get it working: no matter what configuration (except the following one) I tried I was never able to get my feeds updated, some where always updated and other never (and I let it run for a few days to test). I currently have it setup with a BATCH_SIZE of 250 and a polling frequency of 15 minutes to have my feeds regularly updated. This apparently also makes it necessary to adjust the POLLING_PARSING_ERROR_LIMIT (or just disable it since a feed failing for an hour is not some that unusual). My mistake that I found out about this just now and not earlier. However, I'm really curious how these default values where chosen and how the hosted Miniflux service is configured to work for the clients.
FreshRSS
FreshRSS is also not perfect, but there are some good parts anyway. One thing where its IMO better is the subscription management. I have a good overview of all feeds in their respective category and can easily reorder them using drag and drop (or by using a dropdown menu, of course). Another welcoming feature that I don't use that often but which comes in handy from time to time is the display of idle feeds.
Really personal but nevertheless important: the "normal view" that combines what Miniflux splits as a list and a detail view is combined. I see the current list of entries and the excerpt of the one I'm currently focused on. Since I get quite some news (around 270 per day, on weekdays normally over 350) I cannot read all of them completely (or even the excerpt) and therefore just skim over them. Since the skimming is sometimes faster than me pressing "j" (and always faster than pressing the "next" button on mobile) for the next article to focus the combined list but helps me to get more quickly through the list.
On the bad side there are obviously some things. All included designs really look dated and this bugs me. I have less and less energy (or perhaps patience) to look at ugly things over and over. I currently use the Ansum theme and this is at least somewhat OKish.
What I also dislike is that the interface as a whole is more convoluted and harder to use. Gladly I don't need to go through the menus that often. Concerning the user interface I also miss the gesture support on mobile devices that Miniflux has.
Something that might play a role in the future although I currently don't care much are the feed item filtering capabilities: Miniflux seems to be more advanced in this area.
Finally I'm not that happy with the sharing capabilities. As I wrote earlier I use Pocket a lot and really would need some way to add articles there with just one click or keyboard shortcut. Currently I'm opening them all in tabs while skimming and add them manually later which is obviously quite annoying.
Conclusion
First of all I need to say that both tools (and also all the others I mentioned) are great! I'm extremely grateful for all maintainers, developers and contributors behind these projects. Most, if not all, problems described here most likely exist due to personal preferences or perhaps misconfigurations. That's why I will not search for yet another tool that might handle some of my problems better.
But the problem still exists: Which tool to keep and which to get rid off?
While perhaps I could solve the theming problem and the Pocket integration in FreshRSS quite easily it would still mean more work and maintenance than just living with Miniflux. Right now I'm a little bit more for sticking with FreshRSS but I didn't decide yet.
I'll keep you posted!
Day 6 of the #100DaysToOffload challenge.
DONE My Emacs package of the week: orgit @100DaysToOffload git emacs orgmode
CLOSED: [2022-01-21 Fri 18:42]
- State "DONE" from "TODO" [2022-01-21 Fri 17:53]
As you may now I joined the 100 Days To Offload challenge and therefore need some content. Since it seems that I always write about stuff that is more or less connected with Emacs anyway I though I could start a series called "My Emacs package of the week" where I present some package I stumbled upon recently or I used for quite some time but is interesting enough to show. I intend to do this weekly (at least during the challenge) but I cannot promise that I find a package every week that I want to present.
However, this weeks package is orgit by Jonas Bernoulli (the guy that also maintains Magit, the one and only Git interface). What does it? It defines Org link types for linking to Magit buffers from Org mode.
So, why is it may favorite package of the week? When I develop software I like to keep track of the tasks I would like to achieve (of course using Org) and I found out that I also really like to write down my thoughts on tasks that come to me over time. So when I finish a chore the Org entry sometimes resemble more a story than just a todo. Since it is still software development "behind"" the scenes, Git plays an important role. In the past when I pasted commit SHAs I usually linked to the corresponding commit in the remote but I would prefer it, if takes me to my local clone instead. So I searched quickly earlier this week and was quite surprised and happy that the first result was from the Magit GitHub organization.
Since the last days were a little bit busy I first had no time to try the package and later decided that I could combined this with a blog post. So lets start by loading it with use-package (I have Melpa configured but it is also available on NonGNU ELPA).
(use-package orgit
  :after (magit org))
The package itself provides only one command which may be interesting further down the road: orgit-store-link. Reading the documentation it acts the same as the org-store-link function but not storing a link to one commit but to all selected commits. For now I only want to link to one commit. Since the file I'm writing this very blog post into is actually stored in a Git repository this is obviously the best example to start. After opening my Magit status buffer with C-x g (that is holding the control key while pressing x, letting go of both and pressing just the g letter).I went to the "recent commits" section, open the commit of my previous post and got the link to it using org-store-link (I have it bound to C-c l but not sure if I or Org did this). Afterwards I can insert the link using org-insert-link (C-c C-l) and here it is:
[[orgit-rev:~/projects/mmk2410.org/::e1b5ee5496fe7147c77985ac5f49e8bb7f4d4725][~/projects/mmk2410.org/ (magit-rev e1b5ee5)]]
Opening this link using org-open-at-point (C-c C-o) brought me directly to the Magit buffer for the revision. For just linking to the Magit status buffer of my project I can execute the org-store-link command right after opening it.
[[orgit:~/projects/mmk2410.org/][~/projects/mmk2410.org/ (magit-status)]]And visiting it works just the same!
But there is currently a problem. When exporting an Org buffer e.g. to Markdown to upload it to a team wiki or something else, Org checks whether the links are resolvable and fails for the orgit ones. Makes sense since nobody else can open my Magit buffer from a Wiki (at least I hope so!). But this is where orgit gets really good: it has built-in support for exporting these links and this is also enabled by default. There is just one catch why it does not work for me. orgit uses by default the remote named origin (this can be customized by setting orgit-remote) and creates the real HTTP links using the predefined forges and their base URLs. Since I use my own self-hosted Gitea instance it is clear that Orgit dos not know a base URL for it. So lets adjust the orgit-export-alist variable that stores this configurations by adding a definition for my Gitea instance.
(add-to-list 'orgit-export-alist
             '("git.mmk2410.org[:/]\\(.+?\\)\\(?:\\.git\\)?$" ;; the regex to match the remote
               "https://git.mmk2410.org/%n" ;; The link to the status
               "https://git.mmk2410.org/%n/commits/commit/%r" ;; The link to the log.
               "https://git.mmk2410.org/%n/commit/%r")) ;; The link to the revision
As written in the documentation for orgit-export-alist it is also possible to set these values using the git config command with the keys orgit.status, orgit.log and orgit.commit. Thereby only the %r (the revision) must appear in the string of the last two keys. The %n in the code above will get expanded to the path of the project. Using this configuration the exporting works and I can now also link here to my projects overview page and the commit of my last blog post (Update 2021-02-03: Well, at least in theory and also locally. But since I'm now probably building my block using a GitLab CI pipeline the links to not work since Orgit cannot find the directory in the link location. Therefore I needed to remove the links.).
That's it! I sure will integrate this package into my workflow and Emacs configuration and I hope you enjoyed this brief presentation.
P.S.: If you 're already a heavy user of Magit then I would like you to consider sponsoring Jonas.
Day 5 of the #100DaysToOffload challenge.
DONE New Project: Accessing my Org-roam notes everywhere @100DaysToOffload pim orgmode emacs
CLOSED: [2022-01-18 Tue 20:10]
- State "DONE" from "TODO" [2022-01-18 Tue 20:10]
Currently my information storage "strategy" is a disaster. I have four (at least I think so, maybe even more) places where I write down information:
- A single org file called
notes.orgwhich is synchronized across my devices (including mobile) using Syncthing. This contains 14 first-level Org headings and apparently 617 headings in total. - A Org-roam directory which is also synchronized across all devices using Syncthing. Currently it contains 266 notes.
- A private MoinMoin wiki running on my VPS. Most of the pages there I have not touched in a long time and the only thing I still actively use it for is storing recipes (where I also will move to another solution, but not org based since multiple people need to work with it) and the documentation for my self-hosted services.
- The Notes app in my Nextcloud instance. There is one shared note and five other more or less useful ones.
Sounds funny? Well… There is a tiny problem: I have no good structure where I put or find what kind of information. While I started using Org-roam for my bachelor thesis I added also various other things in there afterwards. The notes.org file contains something from nearly every possible topic: from cocktail recipes over server administration to conference notes. A similar interesting collection of randomness is also presented in my wiki. Only the Notes app is quite empty. There is one shared note that perhaps won't go anywhere else and a few other notes that I created there for perhaps no reason at all and that I should move to one of the other three blackboxes sooner or later.
But even with "only" three systems this is not something to work with. That is why I set myself the goal to move every note into Org-roam. Why? Mainly because I quite like the approach to only store and link stuff without thinking too much about hierarchy. Time that is invested into thinking where to store the note instead of writing it is IMO wasted.
There is only one problem that I need to solve before I migrate everything. Although the notes are (in theory) also available on my tablet and my smartphone I cannot really access them. Importing all the files into Orgzly would either not work or would make the app useless for its original purpose (agenda and todos). Accessing them via an Emacs instance in Termux would work but is much too cumbersome and also not usable with touch gestures. To make it short: I need some other way.
I looked a bit around yesterday and found some solutions like using org-publish, doing crazy shit with ox-hugo or other dark magic. I also had the idea to use org-roam-ui, the frontend for working directly with the notes made by the Org-roam team. While these are certainly really good solutions especially for a research knowledge base I think that my requirements are a little bit different. I currently don't plan to put my notes in Git (I think that I would be too impractical) and I expect that I have at least some regular situations where I need the notes that I wrote at my computer nearly instantly available from a mobile device. These two requirements together rule out the usage of any continuous integration system, be it based on org-publish, ox-hugo or something else. Besides that my requirements are not that high. In beginning I don't need a graph and even backlinks are something that I don't think are too important when viewing the notes on the go. What I want is a lightweight web application with a search (filename/title and fulltext), potentially filters for filetags and a nice display of a note.
After I searched and my requirements were clear I decided to start building something myself. So yesterday evening I started developing a proof-of-concept app. As a techstack I plan to use Go for the backend and perhaps Alpine.js for the frontend, combined with some CSS framework (at least for the start, at the end I will do a complete custom design as always) which I did not choose yet. Maybe I will try tailwindcss for this. The part of the backend I already wrote is currently more or less just a bare Go HTTP server as a wrapper around some bash commands, e.g. ls /my/roam/dir/*.org or grep -rl search /my/roam/dir. I have my doubts that this will function well if I want more features and that I need to switch to some indexing sooner or later but for the proof-of-concept it should be enough.
Sadly as of now the project is way too crappy to publish it somewhere but during the next weeks I will continue working on it and hope to have something ready to use and show at the end of February (there's no year mentioned for a reason… ;) ). I'll keep you posted!
Day 4 of the #100DaysToOffload challenge.
Improving my new blog post creation @100DaysToOffload emacs orgmode hugo
In my last post I wrote that it is currently quite cumbersome for me to start writing a new blog post. There are mainly two reasons for that. The first is opening the file. While this sounds quite unimpressive it does not make fun to navigate three directories from my home until I can open it. At least not if you can avoid it. The more annoying part is that I need to define the complete structure and metadata information by myself. For a standard blog post this looks like that:
* My new blog post :@mycategory:mytag1:mytag2:
  :PROPERTIES:
  :EXPORT_DATE: [2022-01-15 Sat 17:24]
  :EXPORT_FILE_NAME: my-nifty-title.md
  :END:

  Finally I can start writing!
To be honest I don't have to type everything by hand. I can use ALT + ENTER at the top of my file to create a new headline and then use C-c C-q (that is CTRL+c CTRL+q for normal people) to set the category and the tags. Additionally I have some help for settings the EXPORT_DATE and EXPORT_FILE_NAME using the org-set-property command which is bound to C-c C-x p and gives me a list of common options to choose from.
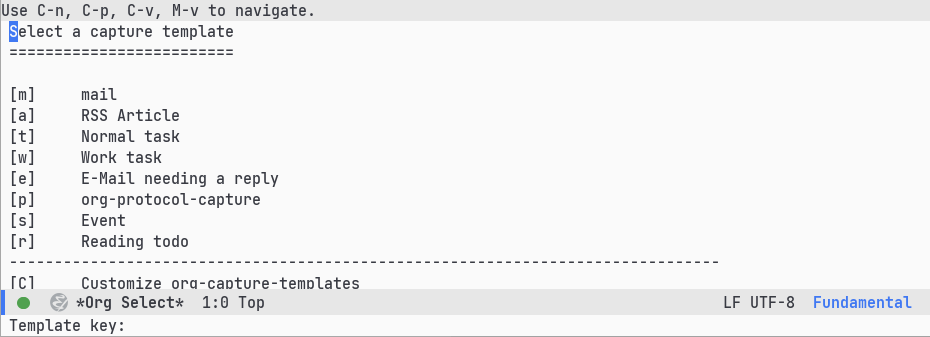
Even using these helpers it does not quite feel that great. But org mode has another feature which makes this a breeze: capture templates. These are templates that one can define in the personal Emacs configuration and access using another keyboard shortcut. I have configured org to present me a list of my capture templates by pressing C-c c and then the letter of the corresponding template.
What I want to do now is to create a new capture template just for starting a new blog post. After some playing around I got the correct cryptic combination that works for me.
(defconst mmk2410/blog-posts-file
  "~/projects/mmk2410.org/content-org/blog.org"
  "Position of my org file containing all blog posts.")
(add-to-list 'org-capture-templates
             '("b" "Blog post" entry (file mmk2410/blog-posts-file)
               "* %^{Title} %^g\n:PROPERTIES:\n:EXPORT_DATE: %^{EXPORT_DATE}U%^{EXPORT_FILE_NAME}p\n:END:"
               :prepend t :empty-lines 1
               :immediate-finish t :jump-to-captured t))
But what exactly does it do? I think the first three lines are still very obvious, even if you have no prior experience in Emacs Lisp: I define a constant to hold the path to the org mode file which contains my blog posts. But then it gets a little bit more difficult. I add a new entry to the list org-capture-templates with the key b and the description Blog post. This will show up in the org capture template select dialog you saw in the image above. Then I state that I want to create a new entry (that means a heading in this context) in the file which path I defined. Still quite easy.
But what about that ugly string? That is the template itself and quite hard to read (and write)! Let's break it apart. The * is just the org syntax for a first-level headline. Following that we have %^{Title}. When I use the template org expands all elements in the template string that start with a %. With the first expansion I tell org to display me a prompt asking for a title. Following that I have %^g. This is also a prompt, but a predefined one! It will ask for keywords, i.e. my category and my tags, giving me some completion options using the already existing ones. The \nPROPERTIES:\n:EXPORT_DATE: is just a literal string which starts the properties block and adds necessary line breaks. Similar as the title prompt %^{EXPORT_DATE}U asks for a export date and the U tells org to expect a date time and it presents a nice prompt with helpful completions. Following that there is a %^{EXPORT_FILE_NAME}p. This time the string inside the curly braces is not only the name of the prompt to display but also the name of the property to set. Why a property? Because of the p at the end! I would have liked to also set the date with such a p prompt and to automatically generate the export file name based on the title but for neither of them I found a solution quickly. The template string ends now with a line break and closes the properties block with :END:. What is generated then looks exactly like my example from above (of course only I if put the same information in…)!
There are still four things to explain. :prepend t tells org to put the new entry at the top of the file (the bottom would be the default but I like to have my blog post sorted descending). empty-lines 1 keeps an empty line above and below the entry. I like this to have a little bit separation between all the headlines. :immediate-finish t and :jump-to-captured t are kind of a combination here. Normally org mode presents the capture process completely isolated from any content and afterwards returns to the file you edited before choosing the template. In this case I would like to see all other blog posts (e.g. for referencing or copying). So I request to immediately finish the capture process after filling out all prompts, open the file where the new entry was created and put my cursor at the headline of the new post.
That's it! So I could fulfill both my wishes that I wrote at the start of the blog and I'm now able to more quickly start writing (or drafting) a blog post.
Day 3 of the #100DaysToOffload challenge.
Update 2022-01-16
After posting a link to this post on my Mastodon account the creator of ox-hugo replied and pointed me to the documentation which includes an org caputer template or—to be more precise—a generator for an org capture template which automatically generates the EXPORT_FILE_NAME. He also mentioned that ox-hugo uses the CLOSED property of an org entry (e.g. a blog post) for automatically setting the date. This CLOSED: <date> line is added when a org mode entry is set to DONE using the org-todo command (bound to C-c C-t for me) as long as the variable org-log-done is set to time. Both things are really great and I will switch to them! I should have read the documentation more carefully in the beginning…
How this post is brought to you… @100DaysToOffload emacs orgmode hugo
The #100DaysToOffload challenge starts very well. I'm sitting here at my desk with the to-do in front of me to write post number two. And I have absolutely no idea what to write! Well, there are some topics I want to cover on the blog during the next months and the can be part of the #100DaysToOffload but I currently don't know where to start. So what's left then to tell you, dear reader, is how this blog post is brought to you and thereby also include a few hints about what I will write during the next months!
So about that workflow. Let's start the same way that I work with it. Currently I'm running my older Lenovo Y50-70 laptop with Windows 10 since I like to do creative stuff like graphic design or editing photos and therefore rely on software that is not available on UNIX/Linux. However I'm mostly a Linux user and a few years back I fell in the large Emacs rabbit hole and can't get out. So for starting this post I open my Debian WSL2 instance in Windows Terminal and fire up that old editor with setsid emacs. A few seconds later a white rectangle pops up on my screen (I have VcXsrv installed) and I can navigate to my blog.org file in my website repo.
Once I'm there I create a new headline, set two properties: an export file name and an export date, add the #100DaysToOffload category and start writing (or at least I would if I knew what to write). Once that is done I need to manually run (require 'ox-hugo) since I'm quite lazy and never took the time to load this automatically using my Emacs config. But what is ox-hugo? Well, ox is short for org export and hugo is a well-known static site generator. So ox-hugo lets me export my large blog.org file containing all my blog posts to files that hugo can understand. If I'm done writing I exported the new post, run hugo serve in the terminal, visit localhost:1313 in my browser and verify that the content and markup is to my liking. Once I'm satisfied I can upload the changes I made to my website using a hacky script I wrote and spread the word on Fosstodon.
But there are somethings that I would like to optimize. Adjusting my Emacs configuration like written above is just one thing. Another is that it is currently quite cumbersome to create a new blog post. A template, e.g. using org-capture or similar is something I want to investigate in. And I really need to put some time in the publish script…
If you made it this far: Congratulations! You survived this quite technical overview and are ready to read more about my workflow in the future! If you just scrolled to the end: that's also fine. While I can't promise it, I don't think that all of the 98 blog posts that are left will be that technical. And if they are they will explain the stuff I write about.
Day 2 of the #100DaysToOffload challenge.
100 Days To Offload @100DaysToOffload
Since I joined the Fosstodon community over one and a half years ago (boy, time really flies…) I constantly read posts with a hashtag #100DaysToOffload and wondered what the heck this is. Well, someday I read the description and just thought "what a nice idea!" (tl;dr: during a time span of a year, write 100 more or less useful blog posts). Though I never really thought about joining since I cannot imaging writing 100 blog posts in just one year (if you look at my blog you will see that I published five posts during the last two years, with that speed I would need 40 years to finish the #100DaysToOffload). Although I have done something similar in 2015: a project 365: posting a inspiring quote every day for 365 days. Well, more or less successfully: on some days I didn't have time and therefore posted two quotes the next day. OK, there were also larger gaps where I didn't post and needed to catch up.
However, this morning I read a blog post by Mike Stone stating that he will try the #100DaysToOffload challenge again after he already failed two times. And at this point for no good reason I started thinking that maybe I should try it to. During the day the thought grew more and more on me, so started writing this post and made a new To-Do in my system to write a new one every three days.
So be prepared for either some awesome and totally useless blog posts spamming you every few days or to watch me utterly fail this challenge. Or a mixture of both. We'll see!
Day 1 of the #100DaysToOffload challenge.
Updates to my website
During the last days I took some time to review and update my website and—while I am at it—also slightly changed some other things. Since there are two thing that may interest you, I decided to write few words about it.
What I Use
In early 2016 I wrote a blog post about what software I use from day to day, motivated by questions from some people. Since then I regularly (meaning around once a year (boy, there is really some outdated stuff there)) updated the post, extending, re-working and updating it. During the last months I saw some other people having a dedicated page on what hard- and software they use and I decided that this would possibly also something for me. So I sat down and created a What I Use page which replaces and extends the old post. It now also features the various hardware that I have lying around. Of course I will also update that page more or less regularly (I added a note on top when it was last updated).
Engage!
Next to a few design tweaks I also better highlighted the possibility to comment on my posts. This follows a great idea I read on the Blog of Kev Quirk to use a button for engaging readers to write their thoughts by email. When I moved from Wordpress (where I used the build in commenting system) to this Hugo based site I no longer had a way for readers to comment on posts As an alternative I put a really small text at the end of each post telling people to write me comments by email (I think I had this idea from Karl Voit). However: I never got any email on my posts (OK, admittedly I do not post much and following the stats there are also not much readers…).
What Kev does is a bit more advanced: while he also follows the idea of not having a commenting system but engaging the readers to write him a mail, he has a much better UX for that. At the end of each post he puts a highly visible button labeled with "Reply via email". I like the idea very much and decided to implement the same approach on this page. So feel free to send me your thoughts by mail using the nice button below!
Automatic UUID creation in some Org-mode files @pim emacs orgmode
I am currently exploring the option in Org mode to export a file (or
some entries) to an ics-file which I can then in turn import into my
calendar. For reliably creating (and most importantly: updating)
entries it is necessary that each one has an unique ID. To create a
ID for the current entry I could just run M-x org-id-get-create and
for an entire file execute the following Emacs Lisp (org-map-entries
'org-id-get-create). Of course this is not an ideal solution. But
adding this s-expression to org-mode-hook would create IDs in all
Org file I edit which I also don't like. Since the amount of files I
do want the automatic creation is (currently) not that large it is
OK for me to do some work on my own, at least if it is only a one
time setup.
The idea which I had to achieve this goal was to create a file-local
variable (called mmk2410/org-create-uuids) that I set to t in the
buffers I need the automatic adding of IDs and adding a hook to
org-mode-hook that in turn adds a hook to before-save-hook for
calling the function mmk2410/org-create-all-uuids that executes the
previously named s-expression to add a ID to each entry in the
buffer.
(setq mmk2410/org-create-uuids nil)
(defun mmk2410/org-create-all-uuids ()
"Create UUIDs for all entries in the current org-mode buffer."
(interactive)
(when mmk2410/org-create-uuids
(org-map-entries 'org-id-get-create)))
(add-hook 'org-mode-hook
(lambda () (add-hook 'before-save-hook 'mmk2410/org-create-all-uuids nil t)))DONE „Mirroring“ my open-source Git repos to my Gitea instance @code git
CLOSED: [2020-08-30 Sun 01:17]
Updates:
- Update 2021-03-25: Git hooks feature disabled by default
- Update 2021-08-23: Built-in mirror feature
tl;dr: GitLab will still be my primary Git platform for my public projects/repositories, but these repositories can now also viewed at my Gitea instance at git.mmk2410.org.
Additional links appearing to my Gitea instance
You may have noticed that I added a link to a Gitea instance on some places next to a link to my GitLab account. The reason behind this is the following.
For years I always had a Git “server” running on my virtual private server (VPS) for private purposes. There was also a time where I had all repositories hosted exclusively on a private Phabricator instance and the only way to interact with them was through it. After that I moved all my public repositories to GitLab and mirror them to my GitHub account. I further used the Phabricanntor instance for private purposes, later switched to a cgit with gitolite installation and a few months ago I set up a Gitea instance because I needed something with Git LFS support and Gitea provides that.
Since I like Gitea quite a bit I started moving some (and as of now any) public repositories to my Gitea instance and mirroring them Gitlab. I have not made this change public since actually nothing changes in practice: I still accept issues and merge requests on GitLab and will keep doing so. In case I myself create issues on my public repositories I will do it also on GitLab. Actually creating a account and interacting with my Gitea instance is currently not possible
So GitLab will still be my primary code hosting platform for public projects/repositories. At least for now and if this changes I will inform you in advance.
Since I do not know where this leads in the future, I start linking to my own Gitea instance.
Mirroring a repository from Gitea to Gitlab
While the main reason for this post was to inform you about the reason for the new links to my Gitea instance you may be also interested in how achieve the mirroring from Gitea to Gitlab.
I setup the sync a few months ago by following a blog post I found. I did not write down the URL of that post so I searched right now for the post. I am not entirely sure but I think it was a German post on Gurkengewuerz called Gitea zu Github mirror.
The idea is quite simple:
- Create a SSH key e.g. with
ssh-keygen -t ed_25519 -b 4096 -f gitea - Add the public key to the Gitlab repository
- Create a post-receive Git hook in the Gitea repository with the following content.
#!/usr/bin/env bash

downstream_repo="Remote SSH URL"
# if tmp worries you, put it somewhere else!
pkfile="/tmp/gitlab-mirror-ed25519"

if [ ! -e "$pkfile" ]; then # unindented block for heredoc's sake
cat > "$pkfile" << PRIVATEKEY
### ENTER YOUR PRIVATE KEY HERE ###
fi

chmod 400 "$pkfile"
export GIT_SSH_COMMAND="ssh -oStrictHostKeyChecking=no -i \"$pkfile\""
# if you want strict host key checking, just add the host to the known_hosts for
# your Gitea server/user beforehand
git push --mirror "$downstream_repo"
(Hmm. Since there are comments in English maybe I found another block back then which uses the same idea. If I find it again I will link it here.)
Update 2021-03-25: Git hooks feature disabled by default
Since Gitea 1.13.0 the "Git Hooks" feature is disabled by default for security reasons. So the method written above does not work any longer without configuration adjustments and apparently also already defined Git hooks are no longer visible in the web interface.
If you operate our own Gitea instance you can however re-enable the web-based Git hooks support by adding DISABLE_GIT_HOOKS = false to the [security] section.
It might be additionally necessary to allow the usage of Git hooks in the user settings.
Before you (re-)enable Git hooks support please make sure, that you fully understand the consequences and the possible security risk! Any Gitea user who can add Git hooks can execute code on the server and thereby possible even get Gitea administrator rights or gain root privileges.
Update 2021-08-23: Built-in mirror feature
The just released Gitea 1.15.0 now includes a functionality to mirror repositories to other Git hosting platforms. You can refer to the official documentation for how to setup your mirror(s).
Given the security concerns explained in my previous update and the simplicity of the new feature it is IMO highly preferable over my hacky workaround. I myself are currently in process of switching the mirroring of my repositories to the new method and thereby also start mirroring them again to GitHub for better discoverability. First tests already passed successfully.
DONE Switching my Website to Hugo using ox-hugo emacs orgmode hugo @web
CLOSED: [2020-05-15 Fri 18:50]
To be honest: my website was always more or less just a large playground for me. It started around 2013 when I created my second website (I had a website before, ~2006/2008, I don't know correctly). Back then I put very much time in designing the thing. In 2014 I taught myself to code and in early 2015 I even wrote a PHP blogging engine called Rangitaki (i have archived it some time ago). Additionally I wrote a script for generating the non-blog websites from markdown files. But I never looked at a static site generator for this purpose.
So it might be a shocker to you that I switched to a self-hosted Wordpress instance in July 2015. The reason was, that I wanted to focus on writing content instead of designing my site. So I also did not create an own theme but just used the 'twentyfifteen' one provided by Wordpress (well actually I created a child theme for ripping out the Google Fonts connection and serving the fonts myself).
Well, focusing on content worked… a little bit…
I actually wrote more posts in 2018 than in the years before. But that changed again in 2019 where I did not even publish one post.
Prior to the switch today I had some experiences Hugo as a static side generator. I already wrote a small blog for myself (I think this was around 2016), a complete design for a friend of mine (I think that was around 2016/17) and for a long time my music/composition website was created using Hugo.
I started thinking about migrating a few weeks ago and read about some possible solutions which included Emacs and Org-Mode. What finally convinced my was the combination of the extensibility of Hugo combined with Org-Mode using ox-hugo. ox-hugo is a Emacs package that provides an exporter for Org. That means: once installed you only press a few keys to create a Hugo entry from a text written in Org. ox-hugo provides to options for working with posts: one post per Org file and one post per org subtree (a section in an Org file). Since org handles many subtrees in one file extremely well I decided to use the later (and preferred) mode.
After the technical decisions where made I started creating and designing my own Hugo theme (in case your interested: it is available at Gitlab: mmk2410/nextDESIGN, although I created it with only my own page in mind, you are free to use it yourself if you want to). My goal for the theme was to be quite light weight (btw. I does not use a single line of JavaScript).
Although I have to say that if there were no ox-hugo I probably would not use Hugo. While it is really extremely powerful it also gave my quite some headaches. Debugging the thing should really be much more easier. Some times I got myself reminded of debugging LaTeX code without an helping environment which translates the errors to human-understandable English.
Next to that I had to somehow migrate my posts from Wordpress to Hugo. While there are quite a few scripts for doing that, I wanted (although it is not necessary) not only to store the new content in Org files but also the existing. And I didn't find an already available solution for that (tbh: I also didn't search that much). So I had to create one myself.
Wordpress has the ability to export a modified RSS XML file called
WXR (WordPress eXtended RSS). Well, I never thought (not even in my
deepest/darkest dreams) that I every need to use XSLT. But for
parsing the WXR file it was actually the best tool. Before looking,
what ox-hugo needed (this was a mistake, I should have looked first
or change my XSL file after looking…) I created the following XSL
file (called orgmode.xsl)which helped my transform the WXR files
to Org files without loosing any relevant information.
<?xml version="1.0"?>
<xsl:stylesheet version="1.0"
xmlns:xsl="http://www.w3.org/1999/XSL/Transform"
xmlns:excerpt="http://wordpress.org/export/1.2/excerpt/"
xmlns:content="http://purl.org/rss/1.0/modules/content/"
xmlns:wfw="http://wellformedweb.org/CommentAPI/"
xmlns:dc="http://purl.org/dc/elements/1.1/"
xmlns:wp="http://wordpress.org/export/1.2/">
<xsl:output method="text" />
<xsl:template match="/rss">
<xsl:for-each select="channel/item">
<xsl:sort select="wp:post_date_gmt" order="descending" />
,* <xsl:value-of select="title" />
:PROPERTIES:
:PUBDATE: <xsl:value-of select="pubDate" />
:POST_DATE: <xsl:value-of select="wp:post_date" />
:POST_DATE_GMT: <xsl:value-of select="wp:post_date_gmt" />
:POST_NAME: <xsl:value-of select="wp:post_name" />
:CUSTOM_ID: <xsl:value-of select="wp:post_id" />
:CREATOR: <xsl:value-of select="dc:creator" />
:STATUS: <xsl:value-of select="wp:status" />
<xsl:if test="string-length(category[@domain='category']) > 0"><xsl:text>
 :CATEGORY: </xsl:text><xsl:value-of select="category[@domain='category']/@nicename" /></xsl:if>
<xsl:if test="string-length(category[@domain='post_tag']) > 0">
<xsl:text>
 :TAGS: </xsl:text>
<xsl:for-each select="category[@domain='post_tag']">
<xsl:value-of select="@nicename"/>
<xsl:if test="position() != last()">
<xsl:text>, </xsl:text>
</xsl:if>
</xsl:for-each>
</xsl:if>
:POST_TYPE: <xsl:value-of select="wp:post_type" />
<xsl:if test="string-length(description) > 0"><xsl:text>
 </xsl:text>:DESCRIPTION: <xsl:value-of select="description" /></xsl:if>
<xsl:if test="wp:postmeta/wp:meta_key = '_wp_attached_file'"><xsl:text>
 </xsl:text>:ATTACHMENT: <xsl:value-of select="wp:postmeta[wp:meta_key='_wp_attached_file']/wp:meta_value" /></xsl:if>
:END:
<xsl:if test="string-length(excerpt:encoded) > 0">
<xsl:text>*</xsl:text>
<xsl:value-of select="excerpt:encoded" />
<xsl:text>*</xsl:text>
<xsl:text>
</xsl:text>
<xsl:text>
</xsl:text>
<xsl:text> </xsl:text>
</xsl:if>
<xsl:value-of select="content:encoded" />
<xsl:text>
</xsl:text>
</xsl:for-each>
</xsl:template>
</xsl:stylesheet>(I know that this is not really professional style or in any sense well done but I don't have any experience in this field and it worked for the task.)
The output generated with xsltproc orgmode.xsl posts.xml >
posts.org was one file which contained all my files with a
structure like the following:
  * Quick Deploy Solution
    :PROPERTIES:
    :PUBDATE: Tue, 14 Apr 2020 08:31:37 +0000
    :POST_DATE: 2020-04-14 10:31:37
    :POST_DATE_GMT: 2020-04-14 08:31:37
    :POST_NAME: quick-deploy-initial-release
    :CUSTOM_ID: 940
    :CREATOR: marcel_kapfer
    :STATUS: publish
    :CATEGORY: code
    :TAGS: cicd, deploy, git, php, programming, typo3
    :POST_TYPE: post
    :END:

    RAW HTML Code of the content.
As I said I looked afterwards, what ox-hugo actually needs (and didn't think of adjusting the XSLT…):
  * Quick Deploy Solution         :@code:cicd:deploy:git:php:programming:typo3:
    :PROPERTIES:
    :EXPORT_DATE: 2020-04-14 10:31:37
    :EXPORT_FILE_NAME: quick-deploy-initial-release.md
    :END:

    Content in Org syntax
As you may see I could have saved some precious time. However the output that ms XSLT created was not that bad and with a few (~20-30) search-and-replace calls (I used the visual-regexp Emacs package) I got what ox-hugo needed. Due to a wrong search-replace at the end I needed to fix some things by hand but otherwise the approach was still faster than writing an own script for that purpose.
So finally I have three org files which reside in a content-org
folder in my website repository:
blog.org: my blog postsquotes.org: my quotes posts (I wanted to have them separately)sites.org: the content for all pages which are not posts
This post is the first one I write in Emacs Org-Mode and I have to say, that it feels quite good doing that in a familiar environment. There is just one thing left to say: how do I publish my site. I earlier mentioned that I have already written a few Hugo sites and so I already had some scripts lying around for doing the job. For now the following bash script does exactly what I want.
  #!/bin/bash

  # Clean aka remove public/ if it exists
  if [[ -d ./public/ ]]; then
rm -rf ./public/
  fi

  # Build the site using hugo
  hugo

  # Deploy using rsync
  rsync \
--archive \
--verbose \
--compress \
--chown=marcel:www-data \
--delete \
--progress \
public/ \
mmk2410.org:/var/www/mmk2410.org/
So this is it. I switched from Wordpress to Hugo using my Emacs, Org-Mode and ox-hugo. Let's see how this will work out in the future.
Quick Deploy Solution @code cicd deploy git php programming typo3

Quick Deploy - a possibly hacky way to deploy a Git repository without much overload and fast setup.
Motivation
From time to time I work on some TYPO3 Site Packages (mostly design work) where seeing the changes is quite important to me. Since TYPO3 needs a web server and a Database server running (well yes, it can be set up locally, but I had some database errors last time I tried). I prefer running it on a virtual private server (VPS) over trashing my computer. So I need to somehow deliver locally made changes to this development server.
In the past I had different approaches for solving this problem. Once I think I had a quite similar (but more dirty) approach for this problem (I don't remember exactly what it was since this was some time ago). The last few times I had a script running locally which mirrored the changes using rsync to the development server. If your interested you can find it in the uulm_hackathon Site Package repository.
For now and future projects (not necessary limited to TYPO3) I wanted another solution which works with the git repository. A few words about my setup: I have a Gitea server (a simple but powerful self-hosted Git server) running on one server and a TYPO3 Development instance running on another one. But this solution should also work on just a bare Git repository and separate server also are not necessary.
The basic idea
The basic idea is that we have some kind of a Git server (GitLab, Gitea, Phabricator, Gitolite, just a bare Git repo on a server) on the one hand which is capable of setting a post-receive Git hook. On the other hand we have a web server with PHP capabilities, e.g. for developing a TYPO3 Site Package in my case. On the web server we have a PHP script (see below) running which gets called by the post-receive Git hook. If the script gets called, it pulls the latest changes from out Git server.
OK, so what I want is some kind of continuous delivering tool. Of course there are already many different solutions available that perfectly fit my purpose. But after some search what I did not find was a tool that is quick and easy to setup. Most of them require docker, which I don't want to setup for various reasons. I simply want something that can be setup and working in a few minutes.
Technical details and setup
As already mentioned in the above section, we have a Git repository or server where we can define a Git post-receive hook and a web server with PHP capabilities. On the Git server / repository we define the post-receive Git hook like in following example.
  #!/bin/bash
  curl https://dev.your-server.rocks/quick-deploy.php?secret=YOUR-SECRET
As you can see it is just a one line bash script which executes curl running a GET request to the given URL. The URL is your domain name (of course) and the quick-deploy.php script as path. We also give the script a secret parameter. The secret (in the example YOUR-SECRET) should only be known to you, the Git hook and the development server. You can create such a secret for example with openssl rand -base64 42. This is all we need to do in our Git repository / server.
On the development server we now need to setup the quick-deploy.php script. The source code for the script with a README and short setup instructions is available in my corresponding "scripts" GitLab repository. We download the script and the example config file on our server and move it to the correct location. Finally we need to adjust the configuration. For that we rename the example config config.example.json to config.json and adjust the values. If not otherwise noted, the variables are required.
remote-path: The path or URL where the Git repository is hosted. You have to make sure, that the development server with the user running the script can access the repository. Gitea for example offers to add a "deploy key" which can pull but not push to the repository. The script currently offers no option to define which SSH key it should use.branch: This is the only optional variable. With it you can choose with branch the script should track. If it is not set, it will default tomaster.local-path: The path where the script can find the local repository on the development server. Make sure that this directory (and if a initialgit cloneshould work also the parent directory) is writable by the user which the script runs (presumablywww-data).secret: This is the secret that we created and set earlier in the post-receive Git hook.
Since we enter the secret as plain text in the configuration we have to make sure, that the configuration file is not accessible from outside the server. So we set the correct permission. A chmod 600 config.example should do the job, but make sure that the script is now owned by the user running the config script. You can check if the permissions are correct by trying to access https://dev.your-server.rocks/config.json. This is of course no high-end security, but it should be sufficient. An attacker knowing the secret key cannot gain any sensible information but just trigger a pull.
That is it. Now the system should work as intended.
Future work
Writing the script was for me a one-day-task (it would have been much faster, but I didn't write and PHP code in the last time). So there is still much room for improvement. If I find the time, I may improve the script.
For me the most wanted feature is a ability to define in the configuration which SSH key should be used. This could be quite particularly interesting if you have a specific key just for one repository and/or multiple repositories you want to track.
The tracking of multiple repositories cloud be another very interesting feature. So the configuration could contain multiple blocks (one for each repository) with the values as described above. Then the pull for a specific repository cloud be triggered with another URL parameter.
It cloud also be possible to write an administration frontend for managing the configuration file over the web, but this is not planned because of its complexity.
Nevertheless how much features will be added in the future, the main goal is, to keep a simple and quick setup. This includes that this script will always be in one file and will not require any software that can not be easily installed (this is the reason, why I use JSON and not YAML).
Contributing
If you are interested in the project and would like to contribute, feel free to do so. I appreciate any help. Bug reports and code contributions are both very welcome.
Updated: Linux Programs I Use @linux programs linux
In early 2016 I wrote a post about some software that I use. Since the last update in March 2016 quite some things changed and I just updated the list. If you are interested, click on the link below.
Firefox tab bar on mouse over @linux css firefox web linux
Since Firefox 57 I'm using wiki of Tab Center Redux:
  #tabbrowser-tabs {
visibility: collapse !important;
  }
I found this solution quite useful over the last months, but recently I got some web design to do and split my screen horizontally in half. In this mode the width of the sidebar used to much space. Disabling it with F1 also didn't really help because then I had no tab list at all.
Today I got the idea of only showing the default tab bar, when necessary. Since I can't capture keys with CSS (and I didn't find a way to create a user JS file like userChrome.css) and pressing a key to show and hide would be too much work, I got the idea of showing the tabbar when hovering.

The trick is to show a small rest of the tab bar above the address bar by default (in this case 5px). Only when the mouse cursor hovers this area, the full tab bar is shown. The following CSS code does this:
  #TabsToolbar {
min-height: 5px !important;
max-height: 5px !important;
opacity: 0 !important;
  }

  #TabsToolbar:hover {
max-height: inherit !important;
opacity: 1 !important;
  }
To use this, you have to paste this CSS code in your file.
Scrolling doesn't work in GTK+ 3 apps in StumpWM @linux commonlisp linux lisp stumpwm
Since some time ago I could not scroll in any GTK+ 3 window in StumpWM with an external mouse. Today I found a workaround for this problem: executing export GDK_CORE_DEVICE_EVENTS=1 in a shell fixes the problem. To set this automatically when starting StumpWM insert the following in your ~/.stumpwmrc:
  ;; bugfix for scrolling doesn't work with an external mouse in GTK+3 apps.
  (setf (getenv "GDK_CORE_DEVICE_EVENTS") "1")
This bug was also reported (and fixed) at the following bug trackers. However, none of those fixes worked for me.
I found this solution at https://www.linuxquestions.org/questions/slackware-14/gtk-3-mouse-wheel-doesn't-work-on-current-wed-sep-25-a-4175478706/.
Disabling comments
Update 03. April 2018: I re-enabled comments with an anti-spam plugin. If it works, I'll keep them enabled, otherwise I'll disable them again.
I'm running this WordPress instance since August 2017 now and at the end of last year my page was finally listed on one of those unreachable lists of WordPress pages, where some friendly bots can write awesome comments about my writing style or try to sell me some nice medicines of the highest quality for the best prices.
Because I sadly don't want to invest the time in thanking those nice people or compare these incomparable offers, I decided to disable comments completely on this WordPress installation.
If you're not one of those guys, feel always free to write me a mail, if you have any questions about one of my articles. If I rate your question high enough I will also append the question with an answer at the original post. The same goes of course for any constructive notices on my bad grammar style or one of those many typos.
If you want to respond to one of my highly provocative articles, I'd rather see at more in-depth response on your own blog/site. If you wrote such a thing, please don't hesitate to send me a link via mail.
best regrads, Marcel
Moving the open-source stuff from phab.mmmk2410 to GitLab @code android bash programs rangitaki scorelib writtenmorse
The journey started in early 2016 when I decided to move my open-source projects and their management away from GitHub. First I launched a cgit instance for viewing the code and set up a gitolite for repository hosting. After a short time I moved the repositories to a self-hosted Phabricator instance at phab.mmk2410.org, because with that platform I had the possibilities for project management like issues or workboards.
But this concept also didn't last for long. A few month later I decided to move the repos again. This time to GitHub profile. Since I couldn't import the GitLab public key into GitHub ("This key is already used by someone else") and a password authentication did not succeed (don't ask why, I don't know) I decided to use Phabricator for that. Phabricator has the ability to observe another repository and pull the changes from the remote repo but it also has the ability to mirror a repository to another remote repository. And luckily it can do both with the same repository. This mirroring system is also further in use to display all my repositories not only on my GitLab but also on my GitHub profile.
Now, after one and a half year, I decided to also move the tasks and wiki articles from Phabricator to GitLab. This should reduce the need for two accounts on two platforms and also the problem, that some people are creating issues on the "wrong" platform. Now contributors can also make use of the referencing abilities of GitLab.
I declined moving everything back when I moved the repositories because I liked (and still like) the way Phabricator works. Instead of GitLab or GitHub it is not repository-centered but project-centered (but not strictly). While in GitLab or GitHub you create a repository and in this repository you have your complete project management stuff, the wiki, the bug tracker, the CI, etc., in Phabricator, each is its own application and can be used without the need of a repository. For access control or grouping things you can use project, but you don't have to. Everything also works perfectly on its own. But what is the advantage of it? Well, for some of my projects, like the writtenMorse project, I have several repositories for the different applications. Where would you report, say, a missing code? In Phabricator I had a writtenMorse project and you could create an issue and add the writtenMorse project tag to it. To realize the same thing in GitLab or GitHub you would need a meta-repository for general issues or for wiki articles. This is also the reason why I keep my Phabricator instance running for private purposes.
If you once created an account on phab.mmk2410 and don't work on any private projects with me, your account was either disabled if you interacted with the platform in some way, or removed in case you didn't.
The migration is already completed and everything can be accessed on GitLab. The former tasks and wiki pages are still accessible at phab.mmk2410 and are more or less directly linked to the new corresponding GitLab object.
Cavallino-Treporti (IT) Bicycle Tour 1 @bicycle bicycle holiday tour
During my holiday in Cavallino-Treport (IT) I discovered the following bicycle track. The tour starts at the Piazzetta della Libertà in Cavallino and goes from there over the Via Francesco Baracca to an first unpaved way and later on Asphalt next to the Fiume Sile to Jesolo, where the river will be crossed. From there the track goes over a cycle path to Lido di Jesolo where the way leads through the inner city. After Lido di Jesolo the trip continues on the main road over the Fiume Sile back to Cavallino.
Netzwerkseminar @beci
Tja, wenn der Tag schon gut startet, was soll man dann erwarten. Nachdem ich auf dem Weg zur Uni nicht mit dem Rad gestürzt bin und der Aufbauf zeitlich sehr gut lief (auf den halbjährlichen Belastungstest der elektrischen Anlage der Universität durften wir dieses Mal verzichten). Doch wenn schon so vieles gut läuft, dann muss ja irgendwann der Rückschlag auf einen zukommen.
Heute kam dieser beim Einschalten meines Computers. Strom, Monitor, Tastatur, Maus und Ethernet waren schon verbunden, von dem her sollte ja eine einfache Betätigung des Einschalters vollend genügen. So einfach war es dann doch nicht. Ich hatte noch kurz etwas anderes zu tun und bemerkte erst nach einige Minuten, dass der Rechner nicht vernünftig bootet, sondern immer wieder neu startet, und kein Bild anzeigt. Durch Ausschalten und Warten konnte ich ihn zumindest dazu überreden, zumindest mal zu booten. Der Moment der Freude war allerdings nur kurz und bald wieder vorbei: Im Login-Screen sah ich etliche rechteckige Blöcke. Ein Neustarte führte wieder in den Bootloop, den ich wiederum durch warten lösen konnte. Beim dritten Mal hab ich es geschafft, in ein System zu booten.
Wenn damit nur alle Probleme behoben wären…
Auf meinem Windows Battelfield 2 einzurichten war nochmal um einiges schwieriger und zeitaufwändiger. Nachdem der dritte Anlauf dort geglückt war, ging es endlich los mit dem Zocken. Ich dachte schon, jetzt kann nichts mehr schief gehen. Der Gedanke hielt sich auch, bis das Essen ankam und Besteck sowie Teller erfrgt wurden. Dies ist ja kein Problem, da die Fachschaft beides in ausreichender Menge hat und die Sachen auch reserviert sind. Als ich den Schrank im Lager aufmachte, schaute ich allerdings ganz schön blöd. Die Teller waren wie gewohnt dort drinnen, vom Besteck allerdings war noch ein Eimer mit den kleinen Löffeln über. Die drei anderen Eimer mit Messern, Gabeln und Löffeln waren wie vom Erdboden verschluckt. Um genau zu sein sind sie das immer noch. Auch eine Mail über die FIN Liste hat noch keine Resultate erzielt. Mal schauen, was da noch rauskommt…
Der Drucker @beci
Wie schwer kann es sein, Altklausuren auszudrucken? Da ich mich, warum auch immer, dazu entschieden habe, Informatik zu studieren und nicht Chemie oder anderes, habe ich das Glück, ein dafür entwickeltes Werkzeug verwenden zu können (bei anderen Fachschaften verwendet man ein Wiki zum Speichern von Altklausuren). Somit beschränkt sich die Arbeit hauptsächlich darauf, schlecht formatierte E-Mails zu entziffern, Vorlesungsnamen in das Programm einzugeben, die letzten paar Altklausuren auszuwählen, den frisch gedruckten Stapel Altpapier zu beschriften und die Leute darüber zu benachrichtigen. Also theoretisch.
Praktisch bin ich mittlerweile mehr damit beschäftigt, die ganzen Kontaktanfragen und Job-Angebote, die der service.fin-LinkedIn-Account erhält, zu beantworten. Spass beiseite.
Eigentlich läuft der Druck gut durch, schließlich stehen im BeCI zwei Drucker, einer druckt schnell, der andere langsam. Zumindest sollte dies der Normalzustand sein. Doch der schnelle Drucker ist seit Anfang November nicht mehr wirklich benutzbar. Es fing ganz harmlos an, mit dem Hinweis, dass der Toner bald leer sei. Dies macht sich auch an der Lesbarkeit der Drucke bemerkbar, was wiederum dazu führte, dass man die dafür verantwortliche Person darauf hinwies und den anderen Drucker verwendete (auf diesem dauert das Drucken zwar drei mal so lange, allerdings ist das bei mäßigem Aufkommen noch gut machbar).
Die verantwortliche Person hat das zum Abholen eines neuen Toners benötigten Formular vorbereited. So viel ist klar. Die weitere sagenumwobene Geschichte dieses Formulars würde allerdings den Rahmen dieser Erzählung um ein Vielfaches sprengen. So mancher Autor könnte darüber wahrscheinlich sogar ein ganzes Buch schreiben, was allerdings leider nicht möglich ist, da keiner die wahren Begebenheiten dieses Formulars und seines Weges kennt. Aber macht ja nichts. Der andere Drucker geht ja noch. Er zieht manchmal die Blätter schlecht ein. Aber ansonsten…
So dachte ich zumindest, als ich eines Dienstags vormittags in das Büro kam um mal wieder Altklausuren zu drucken, in meinem Postfach häuften sich schließlich schon knapp 40 Bestellungen (Tendenz steigend). Anfangs zog er noch 80% der Blätter richtig ein. Der Wert hat sich dann beim Abarbeiten der obersten Bestellungen um 80 Prozentpunkte verschlechtert. Damit stand im BeCI kein funktionsfähiger Drucker mehr und das Drucken von Altklausuren still.
Nach Informierung der StuVe-Computerreferats über den Ausfall des Druckers wurde Plan B ins Leben gerufen: Mit Hilfe eines anderen aktiven FINies (diesem an dieser Stelle auch nochmal mein Dank!) startete ich um viertel nach 12 einen Sprint zum StuVe-Büro, in welchem man neue Toner abholen kann (den leeren Toner habe ich aus dem Drucker ausgebaut und gleich mitgenommen). Um einen Toner abzuholen braucht man allerdings ein Formular. Zur Erstellung dieses Formulars braucht man den Preis des Toners. Dieser steht auf der Verpackung des Toners. Dank der freundlichen und hilfsbereiten StuVe-Geschäftsstelle konnten wir den Toner im zweiten Anlauf im Lager finden, den Preis ablesen und das Formular drucken. An dem Tag habe ich so viel Uni-Sport gemacht wie schon lange nicht mehr.
Nachdem der Toner dann in das BeCI geschafft worden war und ich in mein Pflicht-Tutorium 20 Minuten zu spät kam, ging ich wieder ins BeCI zurück und staunte nicht schlecht, als ich das Druckergebnis mit neuem Toner sah. Bescheiden trifft es nicht ganz. Verschmierte Fliegenscheisse schon eher.
In den folgenden Stunden hat das Computer-Referat beide Drucker wieder betriebsbereit gemacht (bei dem langsamen half das Reinigen der Einzugsrollen, bei dem mit neuem Toner brauchte man ein vorhandenes Ersatzteil). An dieser Stelle auch nochmal eine großes Danke an das Computer-Referat (falls sich jemals einer von denen hierhin verirrt).
Der schon vorher erwähnte andere aktive FINie und ich haben uns den Stapel an eingeganen Bestellungen aufgeteilt und munter zum Drucken angefangen. Ich am langsamen Drucker, er am schnellen. Der Einzug an meinem Drucker ging perfekt, doch der andere Drucker (der mit neuem Toner) brachte eine ganz neue Atmosphäre ins BeCI. Mit unterschiedlichsten Techno-Rythmen begeisterte der Drucker sämtliche Zuhörer. Hätte ihn das Computer-Referat nicht zur stationären Behandlung abgeholt, hätten wir es mit einer Aufnahme wahrscheinlich bis ganz nach oben geschafft. Es bleibt noch abzuwarten ob er jemals wieder aus dem künstlichen Koma aufwacht.
Dank dem anderen Drucker konnten zwei Tage später durch vierstündigen Einsatz dennoch alle Bestellungen vor Weihnachten abgearbeitet werden.
Leute, ich kann ich nur eines empfehlen, bestellt rechtzeitig und (noch besser) druckt auch mal was mit aus.
Rangitaki Version 1.5.0 @code rangitaki
I'm proud to announce a new release of the Rangitaki blogging engine which introduces post excerpts.

Post excerpts are disabled by default and can be enabled with (re-)running php bin/init.php.
Many thanks to Stefan for fixing the OpenGraph and Twitter meta tags.
Quote by Wang Li music quote
Simplicity gives my music its freedom. I am nothing special. I am afraid about the future, I am afraid about the present and I try to find some warming moments in the past.
Wang Li
Rangitaki Version 1.4.4 @code rangitaki
Today I announce 1.4.4 of the Rangitaki blogging engine. It brings an important bug fix concerning the feed creation. Starting from 1.4.0 the feed creation server-side script failed with a 500 internal server error because it was not converted to the new YAML configuration (due to a bug - to be exact: a missing slash - in the .gitignore).
While working on fixing this issue, I also upgraded to the latest version of the feed generator (PicoFeed). The generated feeds will now contain all feed information.
The update script works only from 1.4.3. So I your using an older version of Rangitaki, please upgrade first to 1.4.3.
As usual: Download the script, place it in the root folder of your Rangitaki installation, make it executable chmod +x and run it.
Morse Converter Web App 0.3 @code writtenmorse
Hi folks!
No! The writtenMorse project is not dead!
Yesterday I released version 0.3 of the Morse converter web app. This update brings better performance when converting large texts thanks to a new converting engine written in Dart.
You can test it now live at mmk2410.org/morseconverter.
Feel free to give me feedback either to me at opensource(at)mmk2410(dot)org or on the GitLab project. Thanks!
Rangitaki Version 1.4.3 @code rangitaki
Since the release of Rangitaki 1.4.0 two weeks ago there where three point releases. 1.4.1 and 1.4.2 brought changes to the authentication of the RCC and the RCC API. Caused by these changes you have to rerun php bin/init_rcc.php. To read more about this change habe a look at: https://phab.mmk2410.org/T116
Version 1.4.3 brings the following bugfixes:
- [FIX] Missing space in drawer between "Blogs on" and blogname
- [FIX] Background layer was not removed if drawer was closed
Besides these fixes Rangitaki 1.4.3 includes the theme of my own blog, nextDESIGN.
Since the three releases where in a very short time frame I decided to write the update script to let you update every Rangitaki 1.4 installation (1.4.0, 1.4.1, 1.4.2) to 1.4.3.
Rangitaki Version 1.4 @code rangitaki
Yesterday I released Rangitaki version 1.4 with the following new features and fixes:
- Three new scripts in the
binfolder to simplify the maintenance and setup. Read more below. - Rangitaki API for working with your Rangitaki installation from other apps. Read on how to use the API in the documentation
- SASS and CoffeeScript capabilities for writing extensions and themes. These files are compiled and minimized using Gulp.
- Open links in articles in a new tab.
- Switch to YAML as language for the configuration. Rangitaki 1.4 and above cannot be used without a setup YAML configuration file at
config.yaml. Read more below. - Fix: Atom feeds didn't contain any text
Scripts
One of the main goals of Rangitaki is that anyone able to run a webserver should be able to easily install it. Because time you waste installing and configuring your blogging engine is time you don't have to write articles or do other stuff.
With version 1.4, Rangitaki made another step into this direction. It provides three PHP scripts. One for switch from the old and no longer supported config.php to the YAML config file and two for maintaining and setting Rangitaki and the RCC up.
The scripts are located in the bin\ directory and can only run from the root directory of your Rangitaki installation (not the system root). You can run them with php bin/thescript.php. This requires, that the php-cli package (or whatever name it has in your distribution) is installed on your installation. If you can't install any software on the server which is hosting your Rangitaki blog, you can still run these scripts on your home computer or in a virtual machine running Linux.
Switching config files.
bin/config.php is just there in 1.4 and will be removed in the next version. It's purpose is to switch from the old PHP config file (config.php) to the YAML config file used in Rangitaki 1.4 and above. Read more about this in the next paragraph.
Initializing Rangitaki
bin/init.php is actually more than a script. It's a handy tool for initializing your fresh Rangitaki installation since it guides you through setting all the config values and also for changing your existing configuration, if you don't want to edit the config.yaml directly.
Initializing the RCC and the API
bin/init_rcc.php is used for initializing the Rangitaki Control Center (RCC) and the API. It is separated from the init script since the user needs to provide a password and a username for the RCC and the API and not all users want to use these online tools.
Configuration file switch
I decided to switch from PHP to YAML as a language for the configuration, since PHP is pretty much non-human-readable and also quite limited if more variables are added. So I decided to use YAML because it is very readable for everyone since it doesn't contain any freakin' parentheses, colons or other stuff.
I didn't test it seriously but it didn't seem to take longer to parse the YAML compared then including the PHP file.
The YAML configuration file must be used with Rangitaki 1.4 and above. The old config.php does not work any longer. For switching you can use the script in bin/config.php which does the complete job for you. On how to use the script read the paragraph above.
Version Control System
Before you freak out. NO, Rangitaki does not contain a VCS and will never include one. This is about where Rangitaki is developed. I moved from GitHub (over git.mmk2410.org and over phab.mmk2410.org) to mmk2410.org / marcel-kapfer.de.
The main reason for doing that was and still is, that I think it's crazy to develop free (as in freedom, not as in free beer) on a proprietary platform.
Updating
As always I provide you an update script for easily switch from Rangitaki 1.3.0 to Rangitaki 1.4.0: https://gitlab.com/mmk2410/rangitaki/raw/stable/update-scripts/1-3-0_1-4-0.sh
Happy Blogging!
How to run a web app on your desktop @code desktop electron linux web
Running a web app or a website on your desktop is nowadays much easier thanks to GitHub's Electron.
Why would someone want this?
Well… This is a good question. For me there are only two reasons: you can start it from your launcher and it's handled as its own application. But thats not why I'm writing this guide. My motvation is simple: It works.
Installing required software
For this guide you need npm and git. Search the wide web for installation instructions for your operating systems.
You need also a editor. Choose one you like. The lines of code you're gonna write are just a few.
Cloning the GitHub Repo
Fire up a terminal and clone the GitHub quickstart repo of Electron. = your-web-app= and change into that directory = your-web-app=
Installing dependencies
Next install the npm dependencies with = install= and test the quick start app = start= Normally you should see a window with the dimension 800x600 and on the left side a line of text, on the right the developer console.
Editing the main.js
First were editing the JavaScript file to disable the developer console showing on startup.
Open the main.js file in the editor of your choice and search for the following line (around line 21 in the createWindow() function):
mainWindow.webContents.openDevTools();and comment it out:
// mainWindow.webContents.openDevTools();
Now we're makeing the application window a little bit heighter and wider. Search for the line (around line 15 in the createWindow() function):
mainWindow = new BrowserWindow({width: 800, height: 600});and add to both values 200px so it looks like this:
mainWindow = new BrowserWindow({width: 1000, height: 800});
Run now again npm start and enjoy the cleaner and bigger window.
Editing the index.html
Now open the index.html file delete everything and paste the following lines in there:
  <!DOCTYPE html>
  <html style="width: 100%; height: 100%;">
    <head>
<meta charset="UTF-8">
<title>Your Title</title>
    </head>
    <body style="width: 100%; height: 100%;">
<webview src="https://your-web-app.com" style="width: 100%; height: 100%;" allowpopups plugins>
    </body>
  </html>
Change the title and the src to match the web app you want to bring to your desktop.
Now run your app with npm start and here you have a web app on your desktop.
Installing electron
For creating a desktop application install electron:
= install -g electron=
Now you can start your app with electron .
Creating a launcher
Create now a file your-web-app.desktop and open it in your editor:
  [Desktop Entry]
  Encoding=UTF-8
  Version=1.0
  Name=Your Web App
  Comment=A comment about your web app
  Exec=electron /path/to/your/app
  Icon=appname.png
  Type=Application
  Categories=Network;
  Terminal=false
Search and download now the icon for your application. The higher the resolution the better. Make sure you get a png of svg.
Now move the icon to ~/.local/share/icons/ and the .desktop file to ~/.local/share/applications/.
Now the icon should appear in your launcher (if not log out and in again). If you click on it the web app should start.
Rangitaki Version 1.3 @code rangitaki
A new version of Rangitaki is out providing the following new features:
- Respect do-not-track
- RCC: Generate Atom feed
- Title fix
- Switch to composer
To update from Rangitaki 1.2 (or higher) use this script: https://raw.githubusercontent.com/mmk2410/rangitaki/master/update-scripts/1-2-1_1-3-0.sh
Enjoy blogging!
Programs I use @linux linux programs
Note: I decided to dedicate this topic its own permanent What I Use page instead of this blog post.
Intro
A few people asked me in the last time which tools and programs I use so I decided to put them in a short list.
I often look at lists like "The best …", "Software you need" or similar posts. Not because I need them, but because I want to get inspired and learn about new / other tools that may become a program I use. This also means that in most cases there is more than one program listed below.
But there is one most important thing if you're thinking about using a new / other program: The complete configuration shouldn't take more than what it's worth. It is without any sense to invest many hours to configure or switch to another program, if it doesn't bring you an enormous improvement concerning productivity, speed and / or creativity. Remember always that your time is limited and is better invested in something you want to achieve. And also keep in mind to never just copy a configuration file from someone else. Always write it yourself from scratch and evaluate exactly what you need.
Also keep in mind, that is is a list of software I like. I didn't try all the available alternatives that are out there. If a program is not listed, it doesn't mean that it's bad or that I don't like it.
I will update this list, if something changes, if I have the time.
List
Text Editor / IDE
Graphics and Images
- GIMP (for image editing)
Email client
Web browser
- Firefox (mostly Developer Edition, if available)
Shell
Distributions
Desktop Environments
- KDE Plasma (if you miss a application category in this list and there is a KDE app available then I probably use that)
RSS / Atom Feed Reader
- Nextcloud News (mostly with the corresponding Android apps)
Updates
Edit 16. February 2016: Removed a bunch of non-free (free as in libre) software and added a RSS / Atom Feed Reader
Edit 28. March 2016: Software changes
Edit 25. March 2018: Reworked and updated the complete list.
Edit 25. March 2020: Reworked and updated this post again. Can't believe how old it already is.
The Ending Year @composing minimal_music music
A minimal music piece composed at the end of 2014. Now finally recorded in an acceptable quality.
If you like share it with your friends or even donate me at my page. Thanks.
The Ending Year @composing
Ein Minimal Music Stueck, welches ich eine 2014 komponiert habe, allerdings erst jetzt dazugekommen bin es in annehmbarer Qualtität aufzunehmen: https://www.youtube.com/embed/nHugKFbqgMg
Wenn es dir gefaellt, teile es mit deinen Freund_innen und spende mir vielleicht. Danke
Rangitaki Version 1.2 @code rangitaki
Just in time for Chistmas: Rangitaki Version 1.2.
Features
- Pagination: Split your blog posts over several page
- JavaScript Extension Support
- RCC: Write Posts
- RCC: Delete Posts
- RCC: Upload Media
- RCC: Edit Posts
Notes
Read the upgrading guide before upgrading.
Upgrading
- If you're currently on version 1.0.0 use this update script: https://raw.githubusercontent.com/mmk2410/rangitaki/master/update-scripts/1-0-0_1-2-0.sh
- If you're currently on 1.1.90 use this update script: https://raw.githubusercontent.com/mmk2410/rangitaki/master/update-scripts/1-1-90_1-2-0.sh
Have a lot of fun with Rangitaki 1.2. I wish all of you out there a Merry Christmas!
Rangitaki Version 1.1.90 Beta Release @code rangitaki
The next step on the way to 1.2, the beta release.
Changes:
- BUGFIX: ArticleGenerator error when no tags set
- Pagination: Localized strings
Concerning the localized string: the new string are already added into the shipped english and german language files. If you use your own language file, you have to update your language file with the following strings:
"Next Page" > "Localized next page", "Previous Page" > "Localized previous page",
To update yout blog - keep in mind that this is not a stable release, so don't use it in production - download the update script, make it executable (chmod +x 1-1-2_1-1-90.sh) and run it (./1-1-2_1-1-90.sh). If you're coming from 1.0 you have to run all update scripts. I only provide scripts from pre-release to pre-release and from stable to stable.
Update Script: https://raw.githubusercontent.com/mmk2410/rangitaki/master/update-scripts/1-1-2_1-1-90.sh
Rangitaki Version 1.1.2 Development Release @code rangitaki
I'm glad to announce another milestone an the way to Rangitaki 1.2.
This time it's quite a small one, which brings a few code style improvements and one new feature called pagination, which can split your blog into several pages, each with a set amount of posts.
Pagination is disabled by default. It can enabled through setting:
$pagination = numberThe integer is the amount of posts you wan' to show on each page. E.g. if you set
$pagination = 4you will see four posts on every site.
Warning: If you use your own theme and want to use pagination: You have to update your theme by styling pag_buttons, button, pag_next and pag_prev. Have a look at the themes shipped with Rangitaki.
You can update your installation again with the update script: https://raw.githubusercontent.com/mmk2410/rangitaki/master/update-scripts/1-1-1_1-1-2.sh
Scorelib @code music scorelib
I'm proud to present all of you another piece of software that I wrote: Scorelib.
Scorelib is a music score organization tool with a command line interface, perfect for usage in your favorite terminal emulator. As most of the software I develop, it is written for Linux systems and published on GitHub.
The entered data is saved in a SQLite database in your home directory.
Currently Scorelib is in version 0.1 and I hope, that I find enough time to make it more customizable and to add additional features. Feel free to open Issues on GitHub about bugs or feature requests. You're of course also welcome to contribute to this project, it is written in Python (but don't expect any good code style).
In the lab @private
Sadly this didn't work, but it was fun to make.

Winter is coming… @private
Winter is coming…

Rangitaki Version 1.1.0 Development Release @code rangitaki
It is time for another Rangitaki release and on this way to 1.2 , I release today the first Developmen release 1.1.0, which comes with following changes:
- RCC: Write blog posts
- RCC: Media Upload
- Drawer: Key listener ('ESC' to close, 'm; to open)
- Drawer: Highlight Blogs when hovering
- Drawer: 'X' button
- Metatags / Title based on subblog and / or article
- Script for updatig from 1.0.0 to 1.1.0
I strongly advise you not to update, since this is an untestet development release, if you are willing to risk it, download the update script from this link, make it executable and run it in your rangitaki home directory.
New piece coming soon @composing
Good News!
I just finished the draft for my second piece. Now all I have to do before I can publish it is setting it.
Stay tuned!
Rangitaki Version 1.0 @code rangitaki
Eight months ago I had the idea of a blogging engine. First I planned to write the blogging engine in JavaScript, but in February I learned PHP and I decided, that this is the better language for this project. The main goal of Rangitaki (earlier known as pBlog) was, is and will always be to be as simple to use as possible, but with any possible feature. And I turned out to be possible, especially with the subblogs and the Rangitaki Control Center. Now it is time to release a stable version of what is now called Rangitaki. A blogging engine with focus on simplicity. Easy to install, easy to configure, easy to use.
Rangitaki 1.0 includes the following features:
- Post writing in Markdown with a few keywords for the title, tags, date and the author (all optional)
- Multiple blogs
- A Subpages for each article with a comment box (Disqus; can be disabled)
- Share buttons (FAB; can be disabled)
- Disqus integration (can be disabled)
- Fast and easy configuration
- Google Analytics (optional)
- Twitter and OpenGraph meta tags
- Different themes
- Easy localization (just 3 (!) strings)
- Custom footer
- Navigation drawer (can be disabled)
- Tags
- Set author and date
- Mobile-first
- Rangitaki Control Center (aka RCC; optional, Read the RCC Documentation)
- Online post upload
The development of Rangitaki will continue and I will add many nice features to the blogging engine and to the RCC. So stay tuned.
Morse Converter Android 2.4.0 @code writtenmorse
A new release of the Android app is out. In comes with the same features, that where released with the desktop version 2.0.
- Line break support
- Instant converting
- Intelligent code recognization
- Slightly re-designed UI for the new features
Get the app now at Google Play.
Morse Converter Desktop Version 2.0.0 @code writtenmorse
It's time that I announce a new version of the morse converter with some awesome new features, that will simplify your converting life:
- Completely Native UI with tabs
- Instant converting
- Intelligent code recognization
- Update through the app itself. (Not available in the .deb package or in the Ubuntu repository)
Have fun with it!
Landesverrat @politics
Seit gestern wird gegen die Macher des Blogs netzpolitik.org wegen Landesverrat ermittelt, da sie geheime Dokumente des Verfassungsschutzes veröffentlichten. Dies ist ein schwerer Angriff auf die Meinungs- und Pressefreiheit in Deutschland, doch bei weitem nicht der erste, wie ein Blogartikel von mir aus dem Jahr 2013 zeigt (Meinungsfreiheit in Deutschland?).
Die letzte Ermittlung wegen Landesverrat war vor 33 Jahren gegen die Zeitschrift "Konkret", und vielen sind auch die Ermittlungen gegen den Spiegel vor 50 Jahren bekannt. Und nun ist es wieder soweit: In dem angeblich "demokratischen" Staat wird wieder versucht, kritischen Journalisten, die ihrer Aufgabe nachgingen und geheime Berichte dem Volk zugänglich machten, einen Maulkorb anzulegen.
Aus diesem Grund veröffentlich einige Blogs (wie zum Beispiel correctiv.org) diese Unterlagen und zeigen sich anschließend selbst beim Generalbundesanwalt an.
Ich veröffentliche hier zuerst nur die geheimen Dokumente, ob ich mich auch selbst anzeigen werde entscheide ich in den nächsten Tagen.
Wer netzpolitik unterstützen möchte, kann dies durch ein Spende an diese Konto tun:
Inhaber: netzpolitik.org e. V.
IBAN: DE62430609671149278400
Zweck: Spende netzpolitik.org
Hier ist auch ein Link zu einem Formular für eine Selbstanzeige: https://correctiv.org/media/public/fd/84/fd8461d9-564f-4393-a36d-bc12e1ac0bf2/anzeige_landesverrat_formular.pdf
Artikel vom 15.04.2015
Konzept zur Einrichtung einer Referatsgruppe 3C „Erweiterte Fachunterstützung Internet“ im BfV
Das BfV beabsichtigt den Aufbau einer neuen zentralen Organisationseinheit „Erweiterte Fachunterstützung Internet“ (EFI). Das nachfolgende Konzept beschreibt Hintergründe und Aufgaben sowie den geplanten sukzessiven Aufbau der neuen Organisationseinheit.
Auf der Basis des derzeit vorliegenden Konzepts wurde für die Organisationseinheit EFI ein Personalbedarf i. H. v. 75 Vollzeitäquivalenten mit entsprechender Stellenunterlegung ermittelt.
In einem ersten Schritt wurde zum 01.04.2014 ein Aufbaustab EFI eingerichtet, in den BfV-intern derzeit 21 (Plan-)Stellen mit den entsprechenden Aufgaben aus Abteilung 6, Abteilung IT (PG OTIF) und Abteilung 3 verlagert werden.
In einem zweiten Schritt soll der weitere Ausbau der EFI durch die im aktuellen Entwurf des Wirtschaftsplans 2014 zu Kapitel 0626 Titel 541 01 qualifiziert gesperrt etatisierten 30 Planstellen auf 51 Planstellen erfolgen. Eine Kompensation für diese Planstellen im Kapitel 0626 kann nicht erbracht werden.
Nach einer Konsolidierungsphase soll auf Basis bis dahin gewonnener Erfahrungswerte eine Evaluierung erfolgen.
Organisatorisch ist aufgrund der inhaltlichen Nähe und des G-10-Bezuges die Anbindung an die Abteilung 3 „Zentrale Fachunterstützungsabteilung“ zielführend.
Hintergründe, Aufgaben und geplanter Aufbau der EFI
Die sich ständig verändernden Kommunikationsformen und -medien im Internet erfordern in Bezug auf die Informationssammlung und -auswertung eine strategische und organisatorische Neuaufstellung des BfV.
Ziele des Aufbaus der geplanten Referatsgruppe 3C sollen schwerpunktmäßig die Verbesserung und der Ausbau der Telekommunikationsüberwachung von internetgestützter Individualkommunikation nach dem Artikel-10-Gesetz (G-10) sein. Ferner soll Referatsgruppe 3C die Analyse von allen dem BfV aus unterschiedlichsten Quellen zugänglichen Daten, die im digitalen Zeitalter aufgrund ihres Umfanges oft nicht mehr manuell ausgewertet werden können (u. a. Asservate), umfassen. Daneben werden auch neue Methoden und Maßnahmen zur Datenauswertung in den Aufgabenbereich der Referatsgruppe 3C fallen, bei deren Entwicklung, Anwendung und Umsetzung Fragestellungen in den Vordergrund treten, die eine herausgehobene technische Expertise sowie die Einordnung in einen komplexen Rechtsrahmen erfordern, ohne dass das G-10 einschlägig ist.
Im Einzelnen:
In der geplanten Referatsgruppe 3C soll zum einen der Bedarf der Fachabteilungen zur strategischen, technischen und rechtlichen Entwicklung neuer Methoden der Informationsauswertung und -analyse zentralisiert bearbeitet werden. Ziel ist es, die technische und rechtliche Expertise im Bereich der Internetbearbeitung, insbesondere mit Bezug zum G-10 zu bündeln und für die Fachabteilungen einen einheitlichen Ansprechpartner für dieses komplexe und zunehmend relevanter werdende Phänomen zu installieren.
Zum anderen sollen in der Referatsgruppe 3C die Methoden und Maßnahmen angewandt werden, die aufgrund der Komplexität und/oder wegen des G-10-Bezugs der Daten eine Zentralisierung erforderlich machen. In enger Zusammenarbeit mit der G-10-Auswertung in Referatsgruppe 3B wird die Referatsgruppe 3C die Auswertung in Bezug auf die nach dem G-10 erhobenen Internetdaten aus Einzelmaßnahmen ausbauen.
Zudem werden die bestehenden Ansätze zur verbesserten Auswertung von nach dem G-10 gewonnener Daten (z. B. zentrale Analyse von Telekommunikationsverkehrsdaten) aufgegriffen. Der Ausbau dieser Ansätze birgt einen unmittelbaren Erkenntnismehrwert für die Fachabteilungen. Die zusätzliche Optimierung der allgemeinen G-10-Auswertung und die zentral gefertigten Analyseberichte verstärken diesen Mehrwert.
Die Referatsgruppe soll aus den folgenden sechs Referaten bestehen:
Referat 3C1: „Grundsatz, Strategie, Recht“
Im Referat 3C1 sollen sämtliche Grundsatz-‚ Rechts- und Strategiefragen bezogen auf die oben beschriebenen Aufgaben behandelt werden.
Hier sollen neue Methoden und technische Verfahren erfasst, rechtlich geprüft, getestet und weiterentwickelt sowie „best practices“ zu deren Nutzung entwickelt werden. Das Referat 3C1 wird dazu in enger Abstimmung mit den Fachabteilungen und in Zusammenarbeit mit Referat 3C6 den Bedarf erheben, bündeln und dessen Realisierung über die Abteilung IT koordinieren.
Zudem sollen im Referat 3C1 einschlägige Rechtsfragen zentral bearbeitet werden (etwa zur Zulässigkeit und den Rahmenbedingungen von Internetauftritten zur verdeckten Informationsgewinnung).
Für die vorgenannten Aufgaben wird das Referat 3C1 zentraler Ansprechpartner im BfV. Dies umfasst auch Kontakte zu LfV und anderen Sicherheitsbehörden sowie die Zusammenarbeit mit dem Strategie- und Forschungszentrum Telekommunikation (SFZ TK).
Referate 3C2 und 3C3: „Inhaltliche/technische Auswertung von G-10-Internetinformationen“
In Köln und Berlin soll je ein Referat zur inhaltlichen und technischen Auswertung von Erkenntnissen, die nach dem Artikel-10-Gesetz aus dem Internet gewonnen wurden, aufgebaut werden.
Die TKÜ-Anlage PERSEUS dient im Rahmen der individuellen, anschlussbasierten Telekommunikationsüberwachung nach dem Artikel-10-Gesetz sowohl der Aufbereitung und Auswertung der klassischen Telefonie (z. B. Sprache, Telefax, SMS) wie auch der erfassten Internetkommunikation (z. B. E-Mail, Chatprotokolle, Websessions und Dateitransfere). Ein Teil der gewonnenen Rohdaten wird den G-10-Auswerter/innen von PERSEUS automatisiert aufbereitet und lesbar zur Verfügung gestellt. Jedoch bedarf es zum Auffinden und zur Darstellung bestimmter Informationen aus den Individualüberwachungsmaßnahmen (z. B. eines Facebook-Chats) speziellerer Kenntnisse im Umgang mit der PERSEUS-Anlage und eines vertieften Grundverständnisses der Funktionsweise von aktuellen Internetanwendungen.
Ein Teil der Rohdaten kann von der PERSEUS-Anlage nicht automatisiert dekodiert werden. Diese sollen exportiert und anschließend unter Zuhilfenahme von gesonderten Werkzeugen zur Dekodierung und Auswertung bearbeitet werden. Auf diese Weise sollen aus den bereits vorhandenen Daten aus der Individualüberwachung zusätzliche inhaltliche Erkenntnisse für die G-10-Auswertung aufbereitet und die Ergebnisse den Fachabteilungen zur Verfügung gestellt werden.
Ein Bestandteil der Referate 3C2 und 3C3 wird die technische Unterstützung der dort tätigen Auswertung sein. Die Mitarbeiter/innen der technischen Unterstützung sollen die Schnittstelle zur Abteilung IT bilden und die IT-Infrastruktur mit Bezug auf die Rohdatenauswertung (z. B. Konfiguration der Analysesoftware, Datenimporte‚ Prozessüberwachung) betreuen. Sie sollen außerdem komplexe Anfragen im Analysesystem erstellen und pflegen.
Referat 3C2 soll am Standort Köln dabei überwiegend die Bearbeitung der anfallenden Daten aus den Beschränkungsmaßnahmen in den Abteilungen 2, 4 und 5 (Rechtsextremismus/-terrorismus‚ Geheim- und Sabotageschutz, Spionageabwehr, Ausländerextremismus sowie Linksextremismus/-terrorismus) übernehmen. In Referat 3C3 soll vorrangig die Bearbeitung aus dem Bereich der Abteilung 6 (Islamismus und islamistischer Terrorismus) am Standort Berlin erfolgen. Die räumliche Nähe der technischen G-10-Internetauswertung ist zur Zusammenarbeit untereinander vorteilhaft und in Bezug auf die G-10-Auswertung in Referatsgruppe 3B sowie die Beratung der Bedarfsträger in den Fachabteilungen unabdingbar. Organisatorisch ist deshalb eine referatsweise standortbezogene einer standortübergreifenden Lösung vorzuziehen. Zur Abdeckung von Arbeitsspitzen kann jedoch auch eine standortübergreifende Bearbeitung erfolgen.
Referate 3C4 und 3C5: „Zentrale Datenanalysestelle“
Um den Bedarf der Fachabteilungen an einer Auswertung aller relevanten Erkenntnisse zu den beobachteten Personen (Kommunikationsverhalten‚ Bewegungsprofile etc.) zu bedienen, sollen die Referate 3C4 und 3C5 jeweils an den Standorten Köln und Berlin zur zentralen Analysestelle in Bezug auf komplexe Datenmengen ausgebaut werden.
Die Referate 3C4 und 3C5 sollen zu einzelnen G-10-/§8a-Maßnahmen Auswertungsberichte zu den im Rahmen der angeordneten Überwachungsmaßnahmen angefallenen Metadaten fertigen, z. B. Übersichten der Kommunikationspartner und -häufigkeiten, zeitliche und räumliche Verteilung der Kommunikationen. Bei einer Schnittstellenanalyse wird z. B. anhand der Telekommunikationsverkehrsdaten (TKVD) aufgezeigt, ob Hauptbetroffene verschiedener G-1O-Maßnahmen in direktem Kontakt zueinander stehen oder denselben Mittelsmann kontaktieren (Analyse von Beziehungsnetzwerken).
Die Analyse von TKVD ermöglicht zudem eine präzisere Steuerung der G-10-Auswertung, um zeitnah relevantes Aufkommen zu finden. Auch wenn die Kommunikationsdaten auf der PERSEUS-Anlage ausschließlich aus der Telekommunikationsüberwachung einzelner bestimmter Personen nach dem Artikel-10-Gesetz stammen, kann das Gesamtvolumen insbesondere wegen des stetig zunehmenden Kommunikationsverhaltens nicht mehr vollständig bearbeitet werden. Im Vorhinein muss also möglichst zielsicher das relevante von dem (überwiegend) nicht relevanten Aufkommen sondiert werden.
Die Analyse großer Datenmengen erstreckt sich über den Bereich TKÜ hinausgehend auf alle dem BfV aus unterschiedlichsten Quellen zugänglichen Daten (u. a. Asservate infolge von vereinsrechtlichen Verbotsverfahren). Sie verfolgt das Ziel, die vorliegenden Informationen schnell anhand der Metadaten zu sortieren und somit eine zielgerichtete Auswertung zu ermöglichen. Sie generiert somit zeitnah unmittelbaren fachlichen Mehrwert. Diese Informationsmehrwerte können bei der Analyse komplexer Datenmengen nur mit Hilfe von IT-gestützten Analyse- und Datenbankwerkzeugen generiert werden. Um Synergieeffekte nutzen zu können, ist organisatorisch ein zentraler Einsatz von hochspezialisierten Analyseteams sinnvoll.
Innerhalb der Referate 3C4 und 3C5 soll eine technische Unterstützung eingerichtet werden, die insbesondere die dort tätigen Analyseteams und die Datenerfassung/-aufbereitung berät. Die Mitarbeiter/innen der technischen Unterstützung bilden die Schnittstelle zu den Bereichen, von denen ein Großteil der auszuwertenden Daten generiert wird, sowie zur Abteilung IT und betreuen die analysespezifische IT-Infrastruktur (z. B. Konfiguration der Analysesoftware, Datenimporte, Prozessüberwachung, Erstellung und Pflege von komplexen Anfragen im Analysesystem).
Referat 3C4 wird am Standort Köln überwiegend Daten der Abteilungen 2 (Rechtsextremismus/-terrorismus), 4 (Spionageabwehr, Geheim- und Sabotageschutz) und 5 (Ausländerextremismus und Linksextremismus/-terrorismus), Referat 3C5 am Standort Berlin die Daten der Abteilung 6 (Islamismus und islamistischer Terrorismus) bearbeiten. Hierdurch soll eine räumliche Nähe zu den Bedarfsträgern hergestellt und die Leitungsspanne der Komplexität der Aufgaben angepasst werden.
Referat 3C6: „Informationstechnische Operativmaßnahmen, IT-forensische Analysemethoden“
Zur möglichst umfassenden Auswertung des Kommunikationsverhaltens der beobachteten Personen besteht neben der anschlussbasierten konventionellen TKÜ im Bereich der Internetkommunikation die Notwendigkeit zur Anwendung darüber hinausgehender TKÜ-Varianten. Die „Nomadisierung“ des Nutzerverhaltens, die Internationalisierung der angebotenen Dienste, die Verschlüsselung der Kommunikation sowie die mangelnde Verpflichtbarkeit ausländischer Provider wird ansonsten zunehmend zur Lückenhaftigkeit der Auswertung des Kommunikationsverhaltens der beobachteten Personen führen.
Im Referat 3C6 soll daher die Planung und Durchführung von informationstechnischen Operativmaßnahmen zur verdeckten Informationserhebung nicht öffentlich zugänglicher Informationen im Internet gebündelt werden. Hierzu zählen insbesondere konspirative informationstechnische Überwachungsmaßnahmen von Online-Diensten unter den Richtlinien des G-10-Gesetzes („Server-TKÜ“, „Foren-Überwachung“, „E-Mail-TKÜ“).
Der Bereich IT-forensische Analysemethoden unterstützt die Referate der technischen G-10-Auswertung bei der Auswahl und ggf. Entwicklung von Auswertungssystemen und darüber hinaus die Fachreferate des BfV bei der IT-forensischen Vorauswertung von Rechnersystemen, die z. B. im Rahmen von vereinsrechtlichen Verbotsverfahren als Asservate auszuwerten sind.
Die Aufgaben des Referates 3C6 werden daher zudem insbesondere folgende Bereiche umfassen:
- die Planung und Entwicklung von informationstechnischen Verfahren für den Einsatz in derartigen Operativmaßnahmen sowie für sonstige, auf IT-Systeme ausgerichtete operative Maßnahmen,
- die Datenextraktion, technische Analyse und Bewertung von Datenträgern bzw. datenspeichernden IT-Systemen, insbesondere auch mobiler Geräte, zur Beweissicherung bzw. operativen Informationsgewinnung,
- die technische Beratung der Fachabteilungen in operativen Angelegenheiten, u. a. zu Potenzial und Risiken technischer Methoden der operativen Informationsgewinnung aus dem Internet,
- die strukturierte Sammlung vorrangig technisch geprägter Erkenntnisse und Sachverhalte mit (potenziellem) Bezug zur Internetbearbeitung („Technik-Radar“) und
- den Austausch und die Zusammenarbeit mit anderen Sicherheitsbehörden in diesen Angelegenheiten.
Personalplan der Referatsgruppe 3C „Erweiterte Fachunterstützung Internet“ im BfV
(Tage sind Arbeitstage a 7,5 Stunden pro Jahr.)
Referatsgruppe 3C: Erweiterte Fachunterstützung Internet
| Tage | Laufbahn | Aufgabe |
|---|---|---|
| 200 | hD | Gruppenleitung |
| 21 | hD | Fachaufgaben der Gruppenleitung |
Referat 3C1: Grundsatz, Strategie, Recht
| Tage | Laufbahn | Aufgabe |
|---|---|---|
| 177 | hD | Referatsleitung |
| 44 | hD | Fachaufgaben der Referatsleitung |
| 221 | hD | Referententätigkeiten (Konzeption, Projektmanagement, Strategie, Rechtsprüfung, G-10-Freizeichnungen) |
3C1: Querschnittstätigkeiten
| Tage | Laufbahn | Aufgabe |
|---|---|---|
| 69 | gD | Abstimmung insbesondere mit dem G-10-Grundsatzbereich |
| 46 | gD | Auftrags- und Informationssteuerung |
3C1: Serviceaufgaben
| Tage | Laufbahn | Aufgabe |
|---|---|---|
| 92 | mD | Statistikführung, Terminverwaltung |
| 45 | mD | Vorbereitung von Präsentation |
| 276 | mD | Bearbeitung allg. Schriftverkehr |
| 69 | mD | Aktenverwaltung, DOMUS-Erfassung |
3C1: Bearbeitung von Grundsatz-, Strategie- und Rechtsfragen EFI
| Tage | Laufbahn | Aufgabe |
|---|---|---|
| 99 | gD | Konzeption und Fortschreibung von Grundsatz- und Strategiepapieren |
| 278 | gD | Berichtswesen für die Referatsgruppe (Bearbeiten von Stellungnahmen, Berichten, Sprechzeiten, Erlassen, etc.) |
| 113 | gD | Vorbereitung von rechtlichen Prüfungen |
| 111 | gD | Recherche |
3C1: Zentrale Koordination der technisch-methodischen Fortentwicklung, Innovationssteuerung
| Tage | Laufbahn | Aufgabe |
|---|---|---|
| 111 | gD | Beschreibung von Einsatzszenarien und taktische Konzeption |
| 221 | gD | Koordinierung der methodischen Fortentwicklung innerhalb der Referatsgruppe sowie mit Abteilung IT |
| 119 | gD | Erstellung von Prozessabläufen |
3C1: Bedarfsabstimmungen mit den Fachabteilungen
| Tage | Laufbahn | Aufgabe |
|---|---|---|
| 287 | gD | Anforderungsmanagement |
| 223 | gD | Beratung |
| 45 | gD | Teilnahme an Besprechungen |
3C1: Zusammenarbeit mit weiteren Behörden
| Tage | Laufbahn | Aufgabe |
|---|---|---|
| 204 | gD | Kooperation mit LfV |
| 45 | gD | Kooperation mit SFZ TK |
| 668 | gD | Kooperation mit weiteren Stellen |
Referat 3C2: Inhaltliche/technische Auswertung von G-10-Internetinformationen (Köln)
| Tage | Laufbahn | Aufgabe |
|---|---|---|
| 177 | hD | Referatsleitung |
| 44 | hD | Fachaufgaben der Referatsleitung |
| 221 | hD | Referententätigkeiten (Spezielle technische Analysen, Konzeption technisch-methodische Fortentwicklung) |
3C2: Technische Auswertung von G-10-Internetdaten
| Tage | Laufbahn | Aufgabe |
|---|---|---|
| 97 | mD | Datenaufbereitung, -import, -export |
| 212 | gD | Beratung und Schulung 3B und Fachabteilungen zu Möglichkeiten und Potential der technische Auswertung von G-10-Internetdaten |
| 883 | gD | Technische Auswertung unter Berücksichtigung fachlicher Aspekte |
| 46 | gD | Fachliche und technische Adminstration der Auswertungssysteme |
| 179 | gD | Softwaretechnische Adaption und Konfiguration von IT-Systemen zur Auswertung von G-10-Internetdaten |
| 221 | gD | Methodische Fortentwicklung, Evaluierung von neuer IT-Verfahren zur Auswertung von G-10-Internetdaten, Abstimmung mit Kooperationspartner in diesen Angelegenheiten |
Referat 3C3: Inhaltliche/technische Auswertung von G-10-Internetinformationen (Berlin)
| Tage | Laufbahn | Aufgabe |
|---|---|---|
| 177 | hD | Referatsleitung |
| 44 | hD | Fachaufgaben der Referatsleitung |
| 221 | hD | Referententätigkeiten (Spezielle technische Analysen, Konzeption technisch-methodische Fortentwicklung) |
3C3: Technische Auswertung von G-10-Internetdaten
| Tage | Laufbahn | Aufgabe |
|---|---|---|
| 97 | mD | Datenaufbereitung, -import, -export |
| 212 | gD | Beratung und Schulung 3B und Fachabteilungen zu Möglichkeiten und Potential der technische Auswertung von G-10-Internetdaten |
| 883 | gD | Technische Auswertung unter Berücksichtigung fachlicher Aspekte |
| 46 | gD | Fachliche und technische Adminstration der Auswertungssysteme |
| 179 | gD | Softwaretechnische Adaption und Konfiguration von IT-Systemen zur Auswertung von G-10-Internetdaten |
| 221 | gD | Methodische Fortentwicklung, Evaluierung von neuer IT-Verfahren zur Auswertung von G-10-Internetdaten, Abstimmung mit Kooperationspartner in diesen Angelegenheiten |
Referat 3C4: Zentrale Datenanalysestelle (Köln)
| Tage | Laufbahn | Aufgabe |
|---|---|---|
| 177 | hD | Referatsleitung |
| 44 | hD | Fachaufgaben der Referatsleitung |
| 221 | hD | Referententätigkeiten (insbesondere Bearbeitung von speziellen technischen Analysen, konzeptionnele und methodische Fortentwicklung |
3C4: Analyse von Datenmengen (methodischen Fortentwicklung, Evaluierung von neuen IT-Verfahren zur Datenanalyse, Abstimmung mit Kooperationspartner in diesen Angelegenheiten)
| Tage | Laufbahn | Aufgabe |
|---|---|---|
| 662 | gD | Durchführung von Analyse mit den Bedarfsträgern |
| 331 | gD | Erstellung von Analyse-/Auswertungsberichten für die Fachabteilungen |
| 110 | gD | Steuerung der G-10-Auswertung durch Analyse |
| 111 | gD | Abstimmung mit Ländern (Competence Center Telekommunikationsverkehrsdaten) |
| 441 | gD | Analytische Datenerfassung |
| 441 | gD | Konzeptionelle Weiterentwicklung ITAM |
3C4: Technische Unterstützung
| Tage | Laufbahn | Aufgabe |
|---|---|---|
| 448 | gD | Technische Analyseunterstützung |
| 230 | mD | Datenaufbereitung |
Referat 3C5: Zentrale Datenanalysestelle (Berlin)
| Tage | Laufbahn | Aufgabe |
|---|---|---|
| 177 | hD | Referatsleitung |
| 44 | hD | Fachaufgaben der Referatsleitung |
| 221 | hD | Referententätigkeiten (inbesondere Bearbeitung von speziellen technischen Analysen, konzeptionelle und methodische Fortentiwcklung) |
3C5: Analyse von Datenmengen (methodische Fortentwicklung, Evaluierung von neuen IT-Verfahren zur Datenanalyse, Abstimmung mit Kooperationspartner in diesen Angelegenheiten)
| Tage | Laufbahn | Aufgabe |
|---|---|---|
| 662 | gD | Durchführung von Analyse mit den Bedarfsträgern |
| 331 | gD | Erstellung von Analyse-/Auswertungsberichten für die Fachabteilungen |
| 110 | gD | Steuer der G-10-Auswertung durch Analyse |
| 111 | gD | Abstimmung mit Ländern (Competence Center Telekommunikationsverkehrsdaten) |
| 441 | gD | Analytische Datenerfassung |
| 441 | gD | Konzeptionelle Weiterentwicklung ITAM |
3C5: Technische Unterstützung
| Tage | Laufbahn | Aufgabe |
|---|---|---|
| 448 | gD | Technische Analyseunterstützung |
| 230 | mD | Datenaufbereitung |
Referat 3C6: Informationstechnische Operativmaßnahmen, IT-forensische Analysemethoden
| Tage | Laufbahn | Aufgabe |
|---|---|---|
| 177 | hD | Referatsleitung |
| 44 | hD | Fachaufgaben der Referatsleitung |
| 221 | hD | Referententätigkeiten (insbesondere Beratung, Konzeption von IT-Systemen, spezielle technische Analysen) |
| 28 | gD | Querschnittstätigkeiten |
| 23 | mD | Querschnittstätigkeiten |
3C6: Unkonventionelle TKÜ
| Tage | Laufbahn | Aufgabe |
|---|---|---|
| 297 | gD | Technische Beratung von Bedarfsträgern in operativen Angelegenheiten des BfV |
| 486 | gD | Konzeption, Entwicklung und Programmierung von IT-Verfahren und -Systemen zur verdeckten Informationserhebung bzw. speziellen Telekommunikationsüberwachung |
| 36 | gD | Einsatzdurchführung von Operativmaßnahmen des BfV zur verdeckten Informationserhebung über Computernetze, Maßnahmendokumentation, Einsatzrichtlinien |
| 294 | gD | Datenextraktion und -rekonstruktion, technische Analyse und Bewertung von Datenträgern bzw. datenspeichernden IT-Systemen |
| 359 | gD | IT-forensische Analysen von Datenstromaufzeichnungen und Softwaresystemen, Reverse-Engineering von Software und Kommunikationsprotokollen |
| 32 | gD | Einsatzdurchführung und Einsatzunterstützung von offenen und verdeckten Maßnahmen zur IT-forensischen Datensicherung |
| 23 | gD | Konzeption, Entwicklung und Betrieb von konspirativen technischen Infrastrukturen |
| 248 | mD | Betrieb von konspirativen technischen Infrastrukturen |
| 9 | gD | Mitwirkung und Unterstützung der Fachabteilung bei der Werbung und Führung von Quellen |
| 9 | gD | Zusammenarbeit und Informationsaustausch mit nationalen und internationalen Sicherheitsbehörden |
| 9 | gD | Mitwirkung in Arbeitsgruppen der Internetstrategie des BfV bzw. behördenübergreifende Arbeitsgruppen |
| 20 | mD | Vor-/Nachbereitung von Arbeitsgruppen der Internetstrategie des BfV bzw. behördenübergreifenden Arbeitsgruppen |
| 46 | gD | Technologie-Monitoring, Technik-/Trendfolgenabschätzung mit Bezug zur Internetbearbeitung |
| 46 | mD | Unterstützung bei Technologie-Monitoring, Technik-/Trendfolgenabschätzung mit Bezug zur Internetbearbeitung |
Artikel vom 25. Februar 2015
Technische Unterstützung des Prozesses Internetbearbeitung (2.750 T€)
Das Internet gewinnt als Kommunikations- und Ausforschungsmedium für Extremisten, Terroristen und fremde Nachrichtendienste zunehmend an Bedeutung. Es dient ihnen als global verfügbare Informationsquelle und als Plattform zur weltweiten Verbreitung extremistischer Propaganda mittels Webseiten, Foren oder Videobotschaften. Das Internet erleichtert interessierten Personen in erheblichem Maße die Aneignung von Wissensbausteinen und ideologischen Versatzstücken, unabhängig von Herkunft, Sprache und Religion. Der Konsum von im Internet angebotenem Propagandamaterial kann z.B. Radikalisierungsprozesse initiieren oder beschleunigen. Eine zentrale Rolle nehmen dabei so genannte „Soziale Netzwerke“ wie Facebook, Twitter oder YouTube ein, die auch von verfassungsschutzrelevanten Personenkreisen genutzt werden.
Erfahrungen aus der täglichen Internetbearbeitung des BfV zeigen, dass Extremisten bzw. Terroristen jeglicher Prägung immer größere Datenmengen im Internet veröffentlichen. Das BfV steht vor der Herausforderung, aus der Masse an Informationen die verfassungsschutzrelevanten Erkenntnisse zu extrahieren und diese mit Daten aus anderen Quellen, z.B. von Polizeibehörden, zu verknüpfen. Dies ist aufgrund des Umfangs der Daten manuell nicht mehr möglich. Die anfallenden Daten müssen zunächst in ihrer Rohform erfasst und aufbereitet werden, um sie anschließend miteinander in Beziehung setzen zu können. Auf diese Weise können mittels technischer Unterstützung neue bzw. weiterführende Erkenntnisse gewonnen werden.
Weiterhin nimmt die Komplexität Elektronischer Angriffe durch fremde Nachrichtendienste immer mehr zu. Dies betrifft sowohl den Aufbau der eingesetzten Software auch die Identifizierungsmöglichkeiten der Urheber. Um diesen Angriffen adäquat begegnen zu können, ist eine entsprechend leistungsfähige IT-Infrastruktur erforderlich, mittels derer sich Elektronische Angriffe analysieren und zurückverfolgen und dadurch wirksamer als bisher abwehren lassen.
Um große Datenmengen automatisiert aufbereiten und systematisch analysieren zu können, soll in Kooperation mit externen Stellen aus Forschung und Entwicklung ein System zur Gewinnung, Verarbeitung und Auswertung von großen Datenmengen aus dem Internet entwickelt werden. Damit soll das BfV in die Lage versetzt werden, Massendaten unter den Voraussetzungen der Verschlusssachenanweisung (VSA) auszuwerten und relevante Informationen zu verknüpfen. Damit wird das Ziel verfolgt, bislang unbekannte und nicht offen erkennbare Zusammenhänge zwischen einschlägigen Personen und Gruppierungen im Internet festzustellen. Diese Aufklärung von verdeckten Netzwerkstrukturen trägt dazu bei, Radikalisierungen bei Einzeltätern frühzeitig zu erkennen.
Bei der Massendatenauswertung von Internetinhalten handelt es sich um eine für das BfV neuartige Herausforderung. Im Zuge dessen sind für die Einrichtung und Lauffähigkeit eines Systems zur Gewinnung, Verarbeitung und Auswertung von großen Datenmengen aus dem Internet umfangreiche Maßnahmen im Bereich der IT-Infrastruktur erforderlich. Die für die Internetbearbeitung notwendige flächendeckende Verfügbarkeit von Internetarbeitsplätzen setzt den Aufbau einer modernen Netzinfrastruktur im BfV voraus.
Die gewonnenen Informationen bedürfen aufgrund ihres großen Umfangs einer Vorauswertung mittels intelligenter Werkzeuge. Um der Herausforderung der Massendatenauswertung zielgerichtet begegnen zu können, müssen bestehende IT-Infrastrukturen (Server, Speichersysteme, Arbeitsplatzrechner, Netzwerkkomponenten, Komponenten für Netzwerkübergänge etc.) für Analyse-, Entwicklungs- und Testaktivitäten ergänzt werden. Neben der Analyse der erhobenen Daten bzw. von Elektronischen Angriffen dienen die Erweiterungen dazu, sowohl marktverfügbare erfolgversprechende Hard- und Softwarelösungen in Bezug auf die spezifischen fachlichen und technischen Anforderungen des BfV zu bewerten und ggf. anzupassen, als auch Lösungen selbst zu entwickeln.
In einer dergestalt erweiterten Infrastruktur werden neben speziellen Recherche- und Analysetools, die z.B. die automatisierte Erhebung von offen im Internet verfügbare Informationen (z.B. von Kontaktlisten und Beziehungsgeflechten in sozialen Netzwerken wie Facebook) ermöglichen, auch geeignete Programme zur Analyseunterstützung (z.B. zur automatisierten Textvorauswertung) und zur Visualisierung von Auswertungsergebnissen bereitgestellt bzw. integriert.
Artikelbild: Netzpolitik.org unter CC-BY-SA 3.0
Morse Converter Desktop Public Beta 1.9.3 @code writtenmorse
Today I publish a public beta version of the next version of the morse converter for desktop systems. This version comes with the following new features:
- Intelligent code recognization (code and language)
- automatic / instant converting
- line break support
- integrated update function
- tabbed design
- native ui on all systems
Feel free to try this version.
Please report all bugs at the bug tracker: https://github.com/mmk2410/morse-converter/issues or to opensource(at)mmk2410(dot)org.
Rangitaki Version 0.9: Release Condidate for 1.0 @code rangitaki
It's time now for the last pre-release of version 1.0: the release candidate for version 1.0. After nearly seven weeks Rangitaki is now stable enough to release the last testing version.
This version comes with the following (bug) fixes:
- 'Blogs of {BLOG NAME}' always shown (even if there are no other blogs)
- pictures in articles not centred
- long links longer than article card (especially a problem on mobile devices)
- Localization strings are now grouped in one array
- Better code (in some parts)
I also commented the whole code. The documentation for Rangitaki will releases with version 1.0 (or vice versa).
Rangitaki Version 0.8 @code rangitaki
After one week of testing and bugfixing (mainly the RCC) we now release the beta version (number 0.8) of Rangitaki.
This versions brings various security updates for the RCC and you should really update to this version, if you're using the RCC. Otherwise you can wait until the release candidate , which will come this sunday with more bugfixes, especially for the blogging engine.
Stay tuned :)
P.S: Right now I'm searching for a few people, who can help me to localize Rangitaki by translating the strings in lang/en.php into their language. If you translated theses words, make a pull request on GitHub or send me the file over mail.
Rangitaki Version 0.7 - The alpha release @code rangitaki
Today is the day! I release the alpha release for version 1.0 with the version number 0.7. This means that the development phase for 1.0 is closed and that there will only small improvements and bugfixes. It also means that you can start migrating your blog from 0.2.x to this release, since there wont be any further changes concerning the file structure.
Instead of listing the new features in 0.7 I list now all features that Rangitaki has as of today:
- Post writing in Markdown with a few keywords for the title, tags, date and the author (all optional)
- Multiple blogs
- A Subpages for each article with a comment box (Disqus; can be disabled)
- Share buttons (FAB; can be disabled)
- Disqus integration (can be disabled)
- Fast and easy configuration
- Google Analytics (optional)
- Twitter and OpenGraph meta tags
- Different themes
- Easy localization (just 3 (!) strings)
- Custom footer
- Navigation drawer (can be disabled)
- Tags
- Set author and date
- Mobile-first
- Rangitaki Control Center (RCC; optional, requires linux know-how, do not enable this unless you know what your doing)
- Online post upload
Since mainly everything is done, I will no start writing a documentation for Rangitaki, the RCC, themes and localization. I will also provide a quick-starting guide. These documents will be published with the 1.0 release which is drafted for the end of this month.
I also rewrote the GitHub Readme, so you can find there some additional infos concerning Rangitaki.
A new design for marcel-kapfer.de @design web
Today I roll out a first version of the new marcel-kapfer.de. With this upload not everything is fully designed, but these missing pages will follow later this week or next week.
I decided to go in another direction using more subpages and the same design on every page, if it's just a subpage or its own project.
While designing the new page I not only tried to create a beautiful theme but also to provide a smoother user experience through designing page change animations with JavaScript. What you can actually see is just the beginning :D . I'll gonna improve the page animations to make them more seamless.
The idea was (and still is) to create a colorfull and light design which tries to provide a clean UI and a good UX by leaving large areas free. The important clickable areas in the design are quite large to create a good expirience for mobile users. To make the pages colorfull I choosed a own color (token from the Google Material Color palette) for each page and I used large artwork (mostly icons).
I call this design nextDESIGN 8 which is the eight large release of the nextDESIGN. A web design series which tries to provide beautiful web design since mid 2013. I will release the sourcecode of earlier versions (4 - 7) on GitHub in the next months. For more information write me on Google+ (have a look at the about page).
Rangitak version shedule until 1.0 @code rangitaki
The development on the new Rangitaki blogging engine started a few days ago and the version 0.3 (not ready for productive use) is out. But what are the features of the versions 0.3 until 0.9? First of all there all not ready for productive use. They are just there for testing and bug-fixing. You can obtain a copy on GitHub.
I made also a table about the different versions:
| Version | Features |
|---|---|
| 0.3 | |
| 0.4 | New Features: Tags, Author, Multiple Blogs, Online Upload (optional) |
| 0.5 | Material Design |
| 0.6 | More configuration options |
| 0.7 | Alpha release |
| 0.8 | Beta release |
| 0.9 | Release Candidate |
| 1.0 | Stable final release |
With version 1.0 I will also provide a documentation.
Stay tuned!
Rangitaki Version 0.5 and Material Design @code rangitaki
With the development Version 0.5 Rangitaki has a complete new look, which is based on Material Design.
Why Material Design?
Material Design is influenced by paper and this element was for a long time the main material for the written word. Books, newspaper, letters and also diaries and logbooks were written on paper. So in my opinion is quite natural to use a design which is heavy influenced by this resource.
Read more about Material Design at Google Design page.
What will happen 'til 1.0?
During the next development releases there will be mainly bug fixes and improvements. In version 0.6 there will also more configuration options and more themes.
Morse Converter Android App Version 2.2.7 @code writtenmorse
Version 2.2.7 of the Morse Converter for Android is out and comes with the following changes:
Design
- Added shadow to the actionbar (exept for tablets)
- New layout for about
- Other small design fixes
Functions
- Added option to donate
- Added writtenMorse code list
- Closes keyboard when opening the drawer
Other
- Fixed links in the about sections
- Keyboard closes now after convertion process
- New icon
- Bugfix: Cursor not visible
- Bugfix: Sharing didn't work
Morse Converter Android App Beta testing @code writtenmorse
This week I decided to enable beta testing for new version of the morse converter android app to provide better and less buggier builds for all users.
I would really appreachiate it, if you would help me by testing beta builds. Just join the Google+ community.
Rangitaki Version 0.2.2 @code rangitaki
Today I release a small new version to the new 0.2 series, which includes following changes:
- Links are now underlined, when you hover over them
- Simplified it to add the disqus comments
- Added and configuration option for setting a favicon
- Added the option to use Google Analytics
The following files changed:
- index.php
- blog.css
- config.php
When you updating you installation make sure that your nor overriding your existing configuration. Check on GitHub what are the differences between the two versions.
From pBlog to Rangitaki @code rangitaki
EDIT: 13 August 2015
I decidet to scale down the social appearance of Rangitaki, and so I removed the Google+ Page and the Twitter account. Follow +MarcelKapfer for further updates about Rangitaki./
Some huge changes happend to this blogging engine in the last few days:
- The name was changed from pBlog to Rangitaki: Since the early beginning I searched for a good name for the blogging engine and Rangitaki (from the maori language and means logbook) fits just perfect
- The default color changed to #ff4415
- I wrote a webpage for Rangitaki marcel-kapfer.de/rangitaki
- I created a Twitter profile @rangitaki
- and a Google+ profile +Rangitaki
Abitur und Weisheitszaehne @private abitur
Da ich gerade mitten im Abitur bin und an dieses logischerweise einige Gedanken verschwende, erkannte ich heute morgen eine Verbindung zwischen den Prüfungen und der Entfernung meiner Weisheitszähne.
Was sich im ersten Moment komisch anhört, hat bei genauerer Betrachtung viele Ähnlichkeiten. Das Offensichtlichste ist, dass die Freude nach jeder einzelnen Prüfung, repektive jedem Zahn, enorm ansteigt. Im selben Moment steigt aber auch schon die Angst vor den Schmerzen des nächsten Tests, oder Zahns - je nachdem ob man Wurzeln zieht oder drinnen lässt.
Allerdings gibt es auch gewisse Unterschiede, vor allem im Hinblick auf die Vorbereitungen. Während man sich schon Wochen vor seinem Eingriff mit verschiedensten Doktoren fachsimpelt und sich gewissenhaft auf nur jeden möglichen und unmöglichen Umstand vorbereiten, sieht d_ bayrische Abiturient_in das Abitur des dritten Prüfungsfaches ganz in Ruhe auf sich zukommen. Manche voreiligen Kammerad_innen denken sich dann schon um viertel vor acht: "Musikabi in 'ner dreiviertel Stunde. Ich könnt' mal schön langsam zum Lernen anfangen.". Andere Mitschüler_innen, welche sich von allem befreit fühlen, wollen diesen Zustand auch möglichst lange halten, wie durch den Spruch "Zwei 600er Ibuprofen vor Deutsch braucht's schon!" des häufigeren aufgezeigt wurde.
Auch bezüglich der Vorbereitung in den letzten Minuten vor dem großen Event sind sich Vertreter von Ärzt_innen und Schüler/innen noch immern nicht ganz einig. Während d/ freundliche Kieferchirurg_in mit Baggerschaufelhänden einem den letzten Nerv raubt und dafür einen gekonnt gemischten Mix verschiedenster Chemikalien in den Mundraum pumpt, reicht bei einer Abiturprüfung schon ein gekonnter Griff in das Ü-18 Regal des nächsten Supermarkts um die letzten grauen Zellen in einen ruhigen Schlaf zu schicken. Die Wirkung dieser beiden Methoden ist erstaunlich wirksam und wenn sie erstmal voll einsetzt steht der Party nichts mehr im Weg.
Wenn dann der Kieferorthopäde endlich das Radio einschaltet und mit "Highway to Hell" den ersten Schnitt macht stürzt sich auch der Prüfling tatenfroh auf das so sorgfältig bedruckte Aufgabenheft und gönnt sich einen Artikel aus einem nicht gewählten Aufgabenteil als Morgenlektüre (leider darf man sich keinen Kaffee holen, wenn man "auf's Klo geht" :( ). Und ist die Party dann mal richtig im Gange so lässt er sich durch nichts mehr halten (und hier ist nicht nur der Schüler sondern auch dessen Mundraum gemeint).
Während die meisten Schüler/innen durch ihre anfängliche Überanstrengung nun unaufhaltbar in ein Tief rutschen und dieses mir einer ganzen Schicht an Süßigkeiten und der gesamten Bäckerei von nebenan zu stopfen versuchen, bietet de/ Leidenden d_ strahlende Dorfschmied_in (Stop. Das war eine andere Geschichte…) Kieferorthopäd_in den frisch erbeuteten Schatz an.
Doch auch so manche_r X-trem Schüler/in sieht das Licht am Ende des Tunnels und gibt Vollgas. Und das nicht nur in Chemie. Auch in anderen ähnlich weltfremden Disziplinen lassen es manche Krachen und liefern noch voll im (Taten)rausch 16 ganze Din A4 bei d/ Vorarbeiter_in ab.
Ich persönliche ziehe es an dieser Stelle eher vor meinen Klassenkolleg_innen zu sagen, dass alles gar nicht so schlimm sei und man sich ja nächstes Jahr eh wieder sehe und fahre froh vergnügt und dicht beladen mit meinem Six-Pack in Richtung Osten.
Web App Alpha Release @code writtenmorse
Today I release a first alpha version of the Morse Converter Web App.
This version is not ready for professional use. It's just there for testing and bug finding and fixing.
Have fun with it! :)
pBlog Version 2.1 @code pblog rangitaki
This version includes fixes for the article links. You only have to replace the hrefgenerator.php file in the res folder.
About the Future of pBlog @code rangitaki
I figured out that there will be many changes in the engine which will require many changes in the files (especially the posts file) and in the filestructure. I can't say right now which things will change and what you have to change. Out of this reason. I change the Version numbers and add an zero in front of them. So instead of 2.1 the latest version is now 0.2.1. The 0.2.x series is now on GitHub as an own branch and will recive bugfix updates. The series 0.3, 0.4, 0.5 and so own will be development releases which won't be compatible to the 0.2 series. I recommend current users to stay on 0.2.x - at least until the 1.0 release. I'm verry sorry for this and in case that there are requests I may write a small script that will help you switch to version 1.0.
pBlog Version 2.0 @code pblog rangitaki
This version introduces some very imporant features:
- Own page for every article
- Social sharing buttons (at the moment: google+, twitter, facebook but more will follow)
- Disqus integration
- Local config file -> no more editing the index file
pBlog 2.0 is only partially compatible with prior versions. You don't have to change anything in the posts or intro file (in case you have one), but to switch to version 2.0 you have to replace your index.php with the new one. With this step all your settings like the title will be lost and you have to set them in the new config.php file. For more questions write me a mail to marcelmichaelkapfer@yahoo.co.nz.
In the near future I will spend more time in writing a documentation about the blog engine and adding more comments (especially in the css file).
Morse Converter Android Version 2.1 @code writtenmorse
This release includes the following features:
- Tablet layout
- Display fix in the About section
The update will be available on Google Play in a few hours.
Morse Converter Debian Package @code writtenmorse
For all my users of Debian-based systems: I made a .deb package, so installing will be much easier. Just download the .deb package and execute the following command as root:
dpkg -i morse-converter.deb
If you're using an Ubuntu-based distro: I created a ppa for easy installing and updating. Just fire up a terminal and run the following lines:
  sudo apt-add-repository ppa:mmk2410/morse-converter
  sudo apt-get update
  sudo apt-get install morse-converter
Have a lot of fun!
pBlog Version 1.2 @code pblog rangitaki
In this Version code is better designed so you can read and recognise it better.
This is a code example:
scp -r * marcel-kapfer.de:
pBlog Version 1.1 @code pblog rangitaki
After I published the Version 1.0 last sunday I realized some problems with german umlauts. Now I added a function that converts every umlaut (ü, Ü, ä, Ä, ö, Ö and ß) into the html code.
Week in Review @code design morse rangitaki web
Last week a few big changes happend in my projects. Nearly every project had an bigger release.
- Morse Converter Desktop Edition Version 1.1 (Sourcecode: http://marcel-kapfer.de/writtenmorse)
The Desktop version of the Morse Converter has now the ability to show different languages. German is the first added locale and I hope that some people will submit more localizations.
- Morse Converter Android Edition Version 2.0 (Sourcecode: http://marcel-kapfer.de/writtenmorse)
May the biggest release this week was the version 2.0 of the Android Morse Converter. I re-wrote more or less the whole app to make it awesome. The biggest change is the Material design.
- pBlog Version 1.0 (Sourcecode: https://github.com/mmk2410/pBlog)
Another new project entered the public state last week and saw today the Version 1.0. pBlog is a blogging engine based on PHP, XML and Markdown and it is completly independent from any database. It tries to be as simply as possible. At the moment there are not much features included but more will follow. Right now you're visiting a page created with pBlog.
- My Website (Sourcecode: http://marcel-kapfer.de)
My Website also saw a new release this week (to be exact: today). It is not just a small change - it is a completely new page. Less content and less subpage, simply reduced on the main content (programming). Also new: It is written in PHP to provide a few nice and handy features. Enjoy it!
I hope that I can continue such an amount of new stuff in the future even if I have not much time until middle of June this year.
pBlog Version 1.0 @code pblog rangitaki
Today I'm proud to announce the Version 1.0 of the pBlog - a simple PHP, XML and Markdown based blogging engine which is completly independent from any databases. Even if this is the version 1.0 it is still in a early state of development.
Version 1.0 has the following features:
- Blog writing in XML
- Content in Markdown
- Static intro in Markdown
Material Bildschirmhintergründe 1 und 2 @design wallpaper
Um meinen Desktop / Homescreen besser aussehen zu lassen habe ich kürzlich zwei einfache "Material" Hintergründe gestaltet. Diese sind kostenlos zu downloaden und zu verteilen (CC-BY-SA 4.0). Ich habe diese mit einer hohen 16:9 Auflösung gestaltet, sodass sie auch auf 2k Dislays (und auch auf Größeren) gut aussehen.
Hochformat (z.B. für Smartphones und kleine Tablets)


Querformat (z.B. für Computer und große Tablets)


pBlog Version 0.3 @code pblog rangitaki
This is the Version 0.3 of pBlog. It comes with the following changes:
- Complete Markdown Support
- Design fixes
- a mainlink is no longer required
pBlog Version 0.2 @code pblog rangitaki
The following things are new in this version:
- Design
- Better structure
- cleaned up
More will come when it is ready!
This is the version 0.2.
Morse Converter Android Version 2.0 @code writtenmorse
Today I release the version 2.0 of the Android app. The initial release of the Android app is just about 2 months ago but it is still worth to make a big number jump.
- Fixed a bug in the normal morse encode engine which made this function u nusable until now
- Now both, input and output, are on the same screen
- Added copy to clipboard function
- Material Design: Complete new materialized design (I re-wrote more or less the whole app)
Material Wallpapers 1 and 2 @design material_design wallpaper
To bring a better look to my desktop / homescreen I recently made two simple material like wallpapers. These wallpapers are free to download and to redistribute (CC-BY-SA 4.0). I made them with a high 16:9 resolution that the also look great on 2k screen (or even higher resolutions) and in two versions:
Portrait Version (e.g. for smartphones and small tablets)
Landscape Version (e.g. for computers and large tablets)
Morse Converter Desktop Version 1.1.1 @code writtenmorse
- Fixed a bug in the normal morse encode engine
Morse Converter Desktop Version 1.1 @code writtenmorse
- Added German translation
Blog (Experimental) @code pblog rangitaki
This is a test version in a early state of the new blog engine. By now it supports following things:
- Markdown
- Mainlink and various other links
More will come when it is ready!
This is the version 0.1.
The Ending Year @composing
Today I publish my first composed piece called: "The Ending Year". I composed it at the end of 2014 to review the old year.
UPDATE: Bash script for LaTeX users @tex bash latex
On the 6th I posted a link to this script in the LaTeX community on Google+ (Pastebin.
UPDATE: Bash Skript für LaTeX Benutzer @tex latex
Am sechsten habe ich eine Link zu dem von mir veröffentlichten Shell Skript in der LaTeX Community auf Google+ gepostet (Profile) hat dies gesehen, das Skript angepasst und mit dem inotify-tools ausgestattet. Mit inotify wird die .tex Datei nur dann kompiliert, wenn sie geändert wurde. Hier ist ein Link zu dem Skript auf Pastebin.
Bash script for LaTeX users @tex bash latex
Here a little shell script for LaTeX users who dont use an LaTeX IDE and who often use the command pdflatex. With this script is it possible to do so in regulary times automatically. It is also possible to tell the script how often it should build the PDF-file and how much time should be between these builds. Before you can use this script you have to make it executable with the command chmod +x buildpdf.sh.
  #!/bin/bash
  # A script for automatically creating PDf files from a latex document
  # You can set the amounts of builds and the time between these builds
  # Usage: ./buildpdf.sh filename [build amount] [time between builds in s]
  # Marcel Michael Kapfer
  # 6th January 2015
  # GNU GPL v3.0 -> Feel free to re-distribute it or fork it
  if [[ -z "$1" ]]; then
echo "Usage: ./buildpdf.sh filename [build amount] [time between builds in s]"
exit 1
  else
filename=$1
  fi
  if [[ -z "$2" ]]; then
builds=1
  else
builds=$2
  fi
  if [[ -z "$3" ]]; then
sleeptime=120
  else
sleeptime=$3
  fi
  for ((i=1; i<=$builds; ++i)) ;
  do
pdflatex $filename
echo "Build $i ready"
if (( i < builds )); then
   echo "Waiting $sleeptime seconds - then build again"
   sleep $sleeptime
fi
  done
Bash Skript für LaTeX Benutzer @tex latex
Hier ein kleines Shell Skript für LaTeX Benutzer die keine LaTeX IDE verwenden und somit häufiger von dem Befehl pdflatex Gebrauch machen. Mit dem Skript kann man das in regelmäßigen Abständen automatisch ablaufen lassen. Es ist möglich festzulegen, wie oft der Prozess ablaufen soll und wie lange dazwischen gewartet werden soll. Vor dem Verwenden muss es mit chmod +x buildpdf.sh ausführbar gemacht werden.
  #!/bin/bash
  # A script for automatically creating PDf files from a latex document
  # You can set the amounts of builds and the time between these builds
  # Usage: ./buildpdf.sh filename [build amount] [time between builds in s]
  # Marcel Michael Kapfer
  # 6th January 2015
  # GNU GPL v3.0 -> Feel free to re-distribute it or fork it

  if [[ -z "$1" ]]; then
echo "Usage: ./buildpdf.sh filename [build amount] [time between builds in s]"
exit 1
  else
filename=$1
  fi

  if [[ -z "$2" ]]; then
builds=1
  else
builds=$2
  fi

  if [[ -z "$3" ]]; then
sleeptime=120
  else
sleeptime=$3
  fi

  for ((i=1; i<=$builds; ++i));
pdflatex $filename echo "Build $i ready"
if (( i < builds )); then
   echo "Waiting $sleeptime seconds - then build again" sleep $sleeptime
fi
doneMorse Converter Android Version 1.0.1 @code writtenmorse
- Bugfix:
'#'/ 3 Spaces in front of'+'/ 7 Spaces - Bugfix: Wrong length of the word divider in normal morse
- Bugfix: About on small devices not completely readable
- Bugfix: Landing in writtenMorse after converting normal morse
Morse Converter Desktop Version 1.0.2 @code writtenmorse
- Bugfix: Wrong length of the word divider in normal morse
Morse Converter Desktop Version 1.0.1 @code writtenmorse
- Added program icon
- Bugfix:
'#'/ 3 Spaces in front of'+'/ 7 Spaces
Comfortaa Font for Cyanogenmod Theme Engine @code android cyanogenmod font
This is the open source Comfortaa font by aajohan (aka Johan Aakerlund), packaged for the Cyanogenmod Theme Engine. All the credits go to aajohan. This font has no italic types.


Morse Converter sourcecode now on GitHub @code writtenmorse
I decided that I publish the sourcecode of both applications on Github instead of providing an sourcecode zip package. Feel also free to commit any changes. A link to a trello board will apear on the Github readme soon.
Comfortaa Font für Cyanogenmod Theme Chooser @code android cyanogenmod font
Das ist die open-source Schriftare Comfortaa von aajohann (auuch bekannt als Johan Aakerlund), verpackt für den Cyanogenmode Theme Chooser. Sämtlicher Dank geht an aajohan. Diese Schriftart ist nicht als kursiv erhältlich.
Morse Converter Android App Version 1.0 @code android app morse
I'm proud to present you this android app. With this app you can now convert your code on the way. The application has all the functions that the desktop program has.


It also includes a share button for directly sharing your output to different apps on your device.
I don't plan any apps for other mobile os like iOS.
Morse Converter Android App Version 1.0 @code writtenmorse
I'm proud to present you this android app. With this app you can now convert your code on the way. The application has all the functions that the desktop program has. It also includes a share button for directly sharing your output to different apps on your device. I don't plan any apps for other mobile os like iOS.
Morse Code Converter Android App Version 1.0 @code android writtenmorse
Ich veröffentliche nun eine Android App für writtenMorse. Mit dieser App kannst du nun auch unterwegs text ver- und entschlüsseln. Die App hat die selben Funktionen wie das Desktop Programm.
Die App beinhalted auch einen Teilen-Buttton um die konvertierte Nachricht mit verschiedenen Apps auf deinem Gerät zu teilen
Ich habe nicht vor die App für andere mobile Betriebssysteme wie iOS zu entwickeln.
Morse Code Converter Version 1.0.0 @code desktop java morse
After a few months developing I'm proud to present now the Version 1.0.0. of the Morse Code Converter.

With this version it is possible to convert an unlimited amount of signs. There is also a completely new user interface and the version handles now all converting processes.
The program is able to run under every system including Linux, Mac OS X and Windows as long as a up-to-date java runtime is installed.
Morse Converter Version 1.0 @code writtenmorse
With this version some necessary features are introduced:
- Converting of more than one sign. Now you can de- and encrypt words and sentences,
- Complete new user interface with input and output box in same window and
- All versions (normal morse de- and encrypt and writtenMorse de- and encrypt as well) now in one application.
Morse Converter Version 1.0.0 @code writtenmorse
Nach etlichen Monaten Entwicklung veröffentliche ich nun die Version 1.0.0 des Morse Code Converters.
Mit dieser Version ist es nun möglich mehrere Zeichen umzuwandeln. Des weiteren hat das Programm ein komplett neues aussehen und vereint nun alle Umwandlungsprozese.
Das Programm läuft unter Linux, Mac OS X und Windows, wenn eine aktuelle Java Version installiert ist.
Punktebilanz @code java school
Today I released a little program for german students from the 11th grade. The program is able to calculate the point average. It also shows you the worst entred mark and the highest. Because the software is for german students it's completely in german.

More features will be added when they are ready.
The program is able to run under every system including Linux, Mac OS X and Windows as long as a up-to-date java runtime is installed.
The Software is released under GNU Public License v3.0
Morse Converter Version 0.2.2 @code writtenmorse
This version is also a small release. The hotword windows are improved and, in case you are a developer, the sourcecode is improved concerning formating and the code itself. There is also a new hotword: "missing code".
Morse Converter Version 0.2.1: First public release @code writtenmorse
Small release. Two new hot words.
The writtenMorse website is online @code writtenmorse
Today, after two weeks of coding, the website is online.
Morse Converter Version 0.2 @code writtenmorse
The secound release, now the decoding software is fine. Also the hotwords are new.
Morse Converter Version 0.1 @code writtenmorse
In this release the decode version was kind of useless.
Installation of Debian 8 "jessie" testing @linux debian install jessie
1 Preparation
1.1 Download image
To download a image go to http://www.debian.org/devel/debian-installer/ and copy the download link of the netinstall iso for your architecture from the netinst section (Right Click > Copy Link Location (Firefox) / Copy Link Address (Chrome)) and download it with the command wget -c [copied link] (you can simply paste the link with the shortcut STRG+SHIFT+V). Create now a file for the checksum with the command touch sha512sum in the same folder and open it with nano sha512sum.
Then click in the CD section on your architecture and click on the new page on SHA512SUM and copy from there the line of the netinstall iso (normally it is the second one from the bottom) into the sha512sum file (you can simply use the shortcut STRG+SHIFT+C to paste it). Save now the file with the shortcut STRG+SHIFT+O and close it with STRG+SHIFT+X. Finally check now the iso image with the command sha512sum -c sha512sum.
Normally the image should be fine, if not, try again to download it.
1.2 Preprare the boot device
1.2.1 Prepare a boot DVD
I recommend to burn the CD with brasero. Open the program and click on burn image. Choose then your iso image an burn it on a CD. Now your CD is ready for installing Debian.
Some old dvd drives have problems to boot from a dvd, so you have to choose a CD!
1.2.2 Prepare a boot USB flash drive
Write the ISO image with the following command on your USB flash drive: sudo dd if=debian*.iso of=/dev/sdX
The X is the letter of your USB flash drive. If you are unsure about the name of your usb flash drive, you can find it out with lsblk.
/dev/sda is normally your hard disk, so do not use this device! Now your USB device is ready for installing debian.
1.3 Boot from the installation device
Now reboot your computer and start from the DVD or USB flash drive. You may have to change the boot device by tap F12. On some computers you have to go in the BIOS or EFI with ESC, DEL, F2, or some other key. If the computer doesn't boot from the USB flash drive, make sure that the USB Legacy Support in the BIOS is enabled. Some old computer can't boot from USB, so you have to take a CD. If your computer start from your boot device, then continue with ENTER to start the installation.
TRICK: The default desktop environment in Debian is XFCE. If you want to install another desktop environment, go into 'Advanced Option', then go to 'Alternative Desktop Environment'. Now choose one of the three and continue with install.
2 Installation
2.1 Localization
First choose your favorite language and contuine with ENTER. Then choose your contry. If your contry isn't listed search under others. Choose your keyboard layout in the next step and continue with ENTER.
2.2 Network connection
Choose the network you wanna use and continue with ENTER. If you have only one of them, the installer will automatically continue with this method. 'eth0' is your wired connection and something like 'wlan0' is your wireless connection.
2.2.1 Ethernet connection
The ethernet connection configures itself normally, so you don't have anything to do. Continue with step 2.3.
2.2.2 WiFi connection
Choose the name of your wireless network from the list and continue. If you have a hidden network you have to choose 'Enter ESSID manually'. In the next step you have to choose, if your wireess connection is open or secure. For open one choose 'WEP/Open Network' and for protected networks choose 'WPA/WPA2 PSK', where you have to enter your key in the next step.
2.3 Network configuration
Enter a hostname for your computer. This is the name that appear in your (home) network. Then insert in the next step an domain name. You should use the same on all the computer of your home network. If you didn't use a home network yet, make something up.
2.4 Root and user
The next step is to set up a root password. You need this for example to install or update software. In the next box simply retype this password to verify it. Don't forget this password ever! The next step is about creating a user. In the first box you should insert your full name. Then choose a username. You can also use the one which is automatically insert. Then create a password for the user and verify it.
2.5 Time zone
Next choose your time zone. Which one you have to choose varies in every country.
2.6 Partitioning
I recommend to use the manual way. If you have already a file system on your hard disk the installer should show it. You now can change there you partition details. If you have no file system on you hard disk or simply want to create a new one, choose your hard disk from the list, mostly it is the third option. Then create a new empty partition table. After the installer did this you see again the list from the beginning of this step, only with a few more options.
I recommend for the following procedure a hard drive with at least 40 GB.
2.6.1 Boot partition
Continue with ENTER on the line, which is marked with 'FREE SPACE'. Choose now 'create a new partition'. This partition should have 50MB. Choose 'Primary' in the next step, then choose 'End' in the next step. Change now the partition settings to the following example:
  Us as: Ext4 journaling file system
  Mount point: /boot
  Mount option: default
  Label: boot
  Reserved blocks: 5%
  Typical usage: standard
  Bootable flag: on
If all is set like the example above, continue with 'Done setting up the partition'.
2.6.2 System partition
Continue with ENTER on the line, which is marked with 'FREE SPACE'. Choose now 'create a new partition'. This partition should have at least 20GB. Choose 'Primary' in the next step, then choose 'Beginning' in the next step. Change now the partition settings to the following example:
  Us as: Ext4 journaling file system
  Mount point: /
  Mount option: default
  Label: system
  Reserved blocks: 5%
  Typical usage: standard
  Bootable flag: off
If all is set like the example above, continue with 'Done setting up the partition'.
2.6.3 Home partition
Continue with ENTER on the line, which is marked with 'FREE SPACE'. Choose now 'create a new partition'. Use the rest of the disk minus your RAM size, you need this for the next partition. Choose 'Logical' in the next step, then choose 'Beginning' the next step. Change now the partition settings to the following example:
  Us as: Ext4 journaling file system
  Mount point: /home
  Mount option: default
  Label: home
  Reserved blocks: 5%
  Typical usage: standard
  Bootable flag: off
If all is set like the example above, continue with 'Done setting up the partition'.
2.6.4 Swap
Continue with ENTER on the line, which is marked with 'FREE SPACE'. Choose now 'create a new partition'. Use now the rest of the disk, this is normally the size, that the installation program suggest. Choose 'Logical' in the next step, then choose 'Beginning' in the next step. Change now the partition settings to the following example:
  Us as: swap area
  Bootable flag: off
If all is set like the example above, continue with 'Done setting up the partition'.
2.6.5 Finishing partitioning
Now choose 'Finishing partitioning and write changes to disk', which is normally the last option. Accept now the summary and the partitions will be written on your hard disk.
2.7 Configuration of the package manager
Choose your country, or, if country isn't available choose one which is near your country. Normally you can choose the mirror at the top of the list. Then you can enter a proxy server. If you don't use one just hit ENTER. After that you will be asked, if you want participate in the package usage survey. Choose here what you decide for yourself. If you aren't sure choose no and reconfigure it later with the command dpkg-reconfigure popularity-contest.
2.8 Software selection
For normal users I recommend to select the following software:
- Debian desktop environment
- ssh server
- laptop (if you have a laptop)
- print server
- standard system utilities
Continue with TAB and ENTER.
2.9 Finishing installation
Answer the next question simply with ENTER. Then remove the boot device from the computer until it start again the installer. At the first start you will be asked, if you want to 'Use default config' or simply 'One empty panel'. I recommend to 'Use default config' and customize it later.
So congratulations to your Debian testing "jessie"!
3 Upgrade from Debian 7
If you have already an Debian 7, then make a backup and continue with step 2.
3.1 Install a Debian 7
If the installation above fails, you can try this way to get an Debian testing on your system. First install Debian 7 "wheezy" on your computer. You can mostly following the guide above. You can download it on https://www.debian.org/distrib/netinst.
3.2 Change repositories
After installing, change your repositories as root with the command nano /etc/apt/sources.list
3.2.1 Debian 8 repositories (If you want just the next release)
Replace "wheezy" everywhere with "jessie". It should be look like this:
  deb http://ftp.de.debian.org/debian/ jessie main
  deb-src http://ftp.de.debian.org/debian/ jessie main

  deb http://security.debian.org/ jessie/updates main
  deb-src http://security.debian.org/ jessie/updates main

  deb http://ftp.de.debian.org/debian/ jessie-updates main
  deb-src http://ftp.de.debian.org/debian/ jessie-updates main
3.2.2 Debian testing repositories (If you always want a Debain testing)
Replace "wheezy" everywhere with "testing".
Backport repositories must always have a codename like "jessie".
  deb http://ftp.de.debian.org/debian/ testing main
  deb-src http://ftp.de.debian.org/debian/ testing main

  deb http://security.debian.org/ testing/updates main
  deb-src http://security.debian.org/ testing/updates main

  deb http://ftp.de.debian.org/debian/ testing-updates main
  deb-src http://ftp.de.debian.org/debian/ testing-updates main
3.3 Upgrade the system
Now update first the package list with apt-get update as root. Then upgrade your system with apt-get upgrade && apt-get dist-upgrade also as root.
3.4 Install systemd
I highly recommend to install and use systemd. Install it first with apt-get install systemd as root. Then open the grub configuration with nano /etc/default/grub and add init=/bin/systemd to the line GRUB_CMDLINE_LINUX_DEFAULT. It should look like this:
GRUB_CMDLINE_LINUX_DEFAULT="nomodeset init=/bin/systemd"
Execute then the following commands as root update-grub && reboot.
So congratulations to your Debian testing "jessie"!
Schöne ruhige Zeit @politics
Seit den letzten Wahlen, welche vor einem Vierteljahr stattfanden, war es ruhig in Deutschland. Angenehm ruhig. Ich werde diese Zeit die nächsten vier Jahre sehr vermissen. Drei Monate habe ich nicht das wirre Gerede von so manchen hohlen Politiker_inenn hören müssen. Drei Monate lang hat mich kein hirnlos erstelltes Gesetz aus der Ruhe gerissen. Während viele sagen, dass diese lange Zeit ohne Regierung schlecht war, meine ich genau das Gegenteil. Von mir aus hätte das gerne noch vier Jahre so weiter gehen können. Diese Zeit lernte ich schätzen. Und gerade dann, als ich mich richtig daran gewöhnt hatte, war der Koalitionsvertrag "endlich" ausgearbeitet. Das nächste war dann der SPD-Mitgliederentscheid. Eine Idee für die die ansonsten zweifelhafte SPD-Führung gelobt gehört, auch wenn diese es garantiert nicht aus Gründen des Verlangens nach mehr Demokratie gemacht hat. Genau der selben SPD-Spitze hätte ich allerdings gewünscht, dass die Mitgliederabstimmung gegen die Große Koalition ausgeht. Als ich ein paar Tage nach dem Start dieser Abstimmung im Radio gehört habe, dass die komplette SPD-Führung zurücktritt, wenn die Basis gegen die Koalition stimmt, habe ich mir gedacht: "Leute, das ist eine einmalige Gelegenheit!"". Leider stand die Mehrheit trotzdem hinter der Großen Koalition. Man kann eben nicht alles haben, wobei ich gar nichts gegen eine Große Koalition habe. Es ist eigentlich egal, wer mit wem regiert. Es kommt immer das selbe raus: Ein riesiger Haufen Müll! Nachdem dann das Ergebnis verkündet wurde, war mit klar, dass es aus ist mit der Ruhe. Doch das es SO schlimm kommt, habe ich nicht erwartet. Schon allein die Verteilung der Ministerposten ist ein Grund zum auswandern. Und dann war es so weit: Frau Merkel beginnt ihre Amtszeit mit der obligatorischen Lüge, dass es dem Volk nach diesen vier Jahren besser gehen wird. Es ist zum heulen. Ich wünsche mir diese schöne, ruhige Zeit zurück als diese ganzen Lügner an ihrem geisteskranken Koalitionsvertrag herum gedoktort haben.
Vielen Dank an Jan S. für die Unterstützung!
15. September 2013 @private
Ich habe mich dazu entschlossen wieder einen politischen Artikel zu verfassen. Leider fehlt es mir nurgerade an einem Thema…
Wenn jemand eine Idee hat, über was ich schreiben soll, dann kann er diese mir per Mail an me(at)mmk2410(dot)org mitteilen. Ich denke, dass ich dann trotz der Zeit in der Oberstufe ein wenig Zeit dafür finde.
Ich wünsche allen Schülern die diesen Artikel lesen ein gutes und erfolgreiches neues Schuljahr.
02. August 2013 @private
Tja, mit der Bilderseite war es letzte Woche nichts mehr. Wann das ganze fertig wird, weiß ich auch nicht genau. Wie es gerade aussieht kannst du auf dieser Seite anschauen. Wahrscheinlich dauerts aber noch ein bisschen.
Seit heute bin ich als ein Übersetzter der Software gtkpod tätig.
Jetzt sind erstmal die nächsten sechs Wochen Ferien. Was ich mach, weiß ich zwar noch nicht, aber besser als Schule ist es auf jeden Fall!
22. Juli 2013 @private
Wer auch immer das ließt: Ab heute schreibe ich auf meiner Website im Bereich Blog auch Sachen über mich.
In diesem Blog ist nun alles vermischt: Artikel über die Politik und die Welt, wie auch die Einträge über mich.
Die letzten eineinhalb Schulwochen fangen schon gut an! Und zwar mit den Bundesjugendspielen. Zwar nimmt meine Jahrgangsstufe nicht mehr teil, doch nun heißt die Aufgabe: Organisieren und Leiten. Es geht zwar ganz schön auf die Ohren, wenn man den ganzen Vormittag die Startklappe zuschlagen muss, ist allerdings immernoch bei weitem besser als Unterricht! Der Vormittag dauerte nur bis um 11:20, denn dann war alles wieder aufgeräumt und die Urkunden für die unteren Klassen ausgestellt. Da hieß es dann heimfahren. Heute Nachmittag kamen mir dann zwei (gute) Ideen Für meine Website: zum einen dieser Blog und zum andereneine Bilderseite. Während der Blog jetzt schon so gut wie fertig ist, wird das mit der Bilderseite noch eine Weile dauern. Vielleicht bin ich Ende der Woche fertig.
Das war's auch schon für heute. Die Hitze hat mich ganz schön fertig gemacht. Und da morgen "Unterricht" sein soll, hau ich mich mal jetzt (also um halb 12) in die Kiste.
Meinungsfreiheit in Deutschland? @politics
In den letzten Jahren fielen mir zum Thema "keine Meinungsfreiheit" immer Länder wie China oder Russland ein. Doch das änderte sich am 25. Januar 2011 als das Volk in Ägypten aufstand und gegen Mubarak demonstrierte. Die Protestwelle des arabischen Frühlings hat mir vorallem gezeigt, dass viele Menschen nicht einfach ihrer Meinung sagen können. In Ägypten gingen die Proteste mit über 800 Toten vergleichsweise "friedlich" aus. Bei den Meinungsäußerungen im Nachbarstaat Libyen starben 10.000 Menschen. Darunter 5.000 Rebell_, von welchen die meisten in den Bürgerkreig gezogen sindum ihre Meinung zu sagen. Doch die Welle des arabischen Frühlings ist noch nicht vorbei! Im syrischen Bürgerkrieg, welcher Anfang 2011 begann, starben bisher 93.000 Menschen,viele, weil sie gegen die momentane Regierung sind. Eine Millionen (so geschrieben: 1.000.000) Syrer_innen sind im Exil und vier (!) Millionen auf der Flucht. Und vor ein paar Wochen hat die Welle auch die Türkei erfasst, wo, wie zu sehen ist, auch von der Meinungsfreiheit nichts gehalten wird.
Da stellt sich mir auf einmal die Frage, wie eigentlich die Situation hierzulande aussieht. In Deutschland. Einem Staat, welcher angeblich einer der modernsten und wirtschafttsstärksten weltweit ist. Ein Staat, in welchem die Meinungsfreiheit angeblichgeachtet wird, welche sogar im Grundgesetzt festgehalten ist (Artikel 5). Doch dürfen wir uns, als deutsche Bürger_innen, wirklich frei äußern? Dürfen wir sagen und schreiben was wir wollen? Oder finden wir das, was wir in anderen Ländern vergebens suchen, in Deutschland genauso wenig? In der letzten Zeit sind die Antworten auf die oben genannten Fragen glasklar! Egal ob wir nach Frankfurt, nach Bayreuth oder nach Augsburg blicken.
Einer der neusten Fälle in den letzten Tagen, war der Polizeibesuch bei Frau Gresser, welche in einem Tweet schrieb, dass man Beate Merk am 10.06.13 um 19:00 im Landgasthof Hofolding fragen könne, wann Mollath freikommt. Kurz darauf standen dann zwei Polizisten vor der Tür und schüchterten Frau Gresser ein. An dieser Stelle wurden zwei Sachen in die Tonne getreten, die für eine Demokratie unabdingbar sind. Zum einen die freie Meinungsäußerung und zum anderen die Gewaltenteilung, was einer Diktatur gleichkommt!
Ein anderer Fall ist auch in Bayern geschehen, in Augsburg, um genau zu sein. Frau Johanna Holm hat an die Augsburger Allgemeine Zeitung einen Leserbrief geschrieben, in welchem sie die Aufstellung eines CSU-Bundestagskandidaten kritische betrachtete. Zwei Wochen später bekommt Frau Holm einen Brief von einem Anwalt und einen riesigen Schrecken. Der Anwalt wurde von den CSU Politikern Kränzle und von Hohenhau losgelassen. In dem Briefumschlag fand die Rentnerin das Ultimatum, dass sie entweder ihre Meinung öffentlich dementiern muss und eine Unterlassungserklärung unterschrieben muss, sonst drohe ihr eine Strafe von 5000,01 €. Daraufhin hat die standhafte Augsburgerin die Augsburger Allgeimeine Zeitung kontaktiert, welche einen Artikel dazu schrieb. Viele Leserbriefe und über 300 Internetkommentare gingen daraufhin bei der Zeitung ein. Später entschuldigten sich dann die meinungsfeindlichen Politiker. Wenn ich nur daran denke, dass Menschen, die die Meinungsfreiheit und somit das Grundgesetzt so dermaßen verachten, Politiker sind und theoretisch mal über das Volk regieren, wird mir übel!
Doch es geht auch größer! In Frankfurt wurden 1000 Blockupy-Demonstranten gewaltsam daran gehindert, ihre Meinung zu sagen! Wenn ich die Bilder aus Frankfurts Innenstadt mit denen vom Taksim Platz in Istanbul vergleiche kann ich keine Unterschiede erkennen. In beiden Fällen hat die Polizei total überreagiert. Und der Befehl sicher nicht von einem Polizeibeamten gekommen!
Wenn ich jetzt über den vierten Fall schreibe, dann schreibe ich über einen der größten Justizskandal in der ganzen Geschichte der Bundesrepublik Deutschland. Nürnberg - Bayreuth - München. Das sind die Orte die unweigerlich mit dem Fall Mollath zu tun haben. Mollath. Ein Mann der seit 2006 unschuldig in der Psychatrie in Bayreuth sitzt. Die Gutachten die das Justizopfer als geistig krank einstufen wurden von Leuten geschreiben, die Mollath nie gesehen, geschweige denn mit ihm gesprochen haben. Der Richter der in diesem Fall das Urteil sprach war voreingenommen und hat Mollath weder sich verteidigen lassen noch dessen Verteidigungsschrift gelesen. Mollath, welcher nach meiner Überzeugung im Vollbesitz seiner geistigen Kräfte ist, hat Schwarzgeldgeschäfte der Hypo Vereinsbank zur Anzeige gebracht, bei welchen seine Frau als Vermögensberaterin aktiv beteiligt war. Diese Anzeige wurde von der Polizei nicht bearbeitet, was der, später für den Fall zuständige, Richter Brixner veranlasste. Die Hypo Vereinsbank hat mittlerweile zugegeben, dass Mollath in allen Punkten der Anzeige recht hat. Auch seine Frau und das Gutachten von Dr. Leipziger sind nicht mehr glaubwürdig. So sehe ich keinen Grund mehr, dass Mollath in der Psychatrie sitzt. Mittlerweile sitzt er seit 7 Jahren in der Psychatrie, weil er seine Meinung gesagt hat.
Die hier aufgeführten Fälle sind nur einige von vielen, in denen in Deutschland die Meinungsfreiheit verachtet wird. Ich sehe, dass hier die Politik viel nachzubessern hat, wie zum Beispiel eine stärkere Trennung von Staat und Justiz. Des weiteren hoffe ich, dassMollath bald freikommt und die Unterdrückung von Menschen die ihre Meinung sagen aufhört.